ML Alert Correlation
ML Alert Correlation is a sub-module that helps customers optimize their time while investigating potential downtimes and failures inside the application.
The correlation module helps by analyzing many alert streams from different sources, correlating them by various factors, including data and domain, and reducing the noise. This helps reduce the false positives to the maximum extent and suppresses the events/ alerts fatigue, which greatly helps operators and respective teams improve the MTTR.
Add Workspace
Click on the RCA Workspace from the left navigation menu (Configure Observability > RCA Workspace).
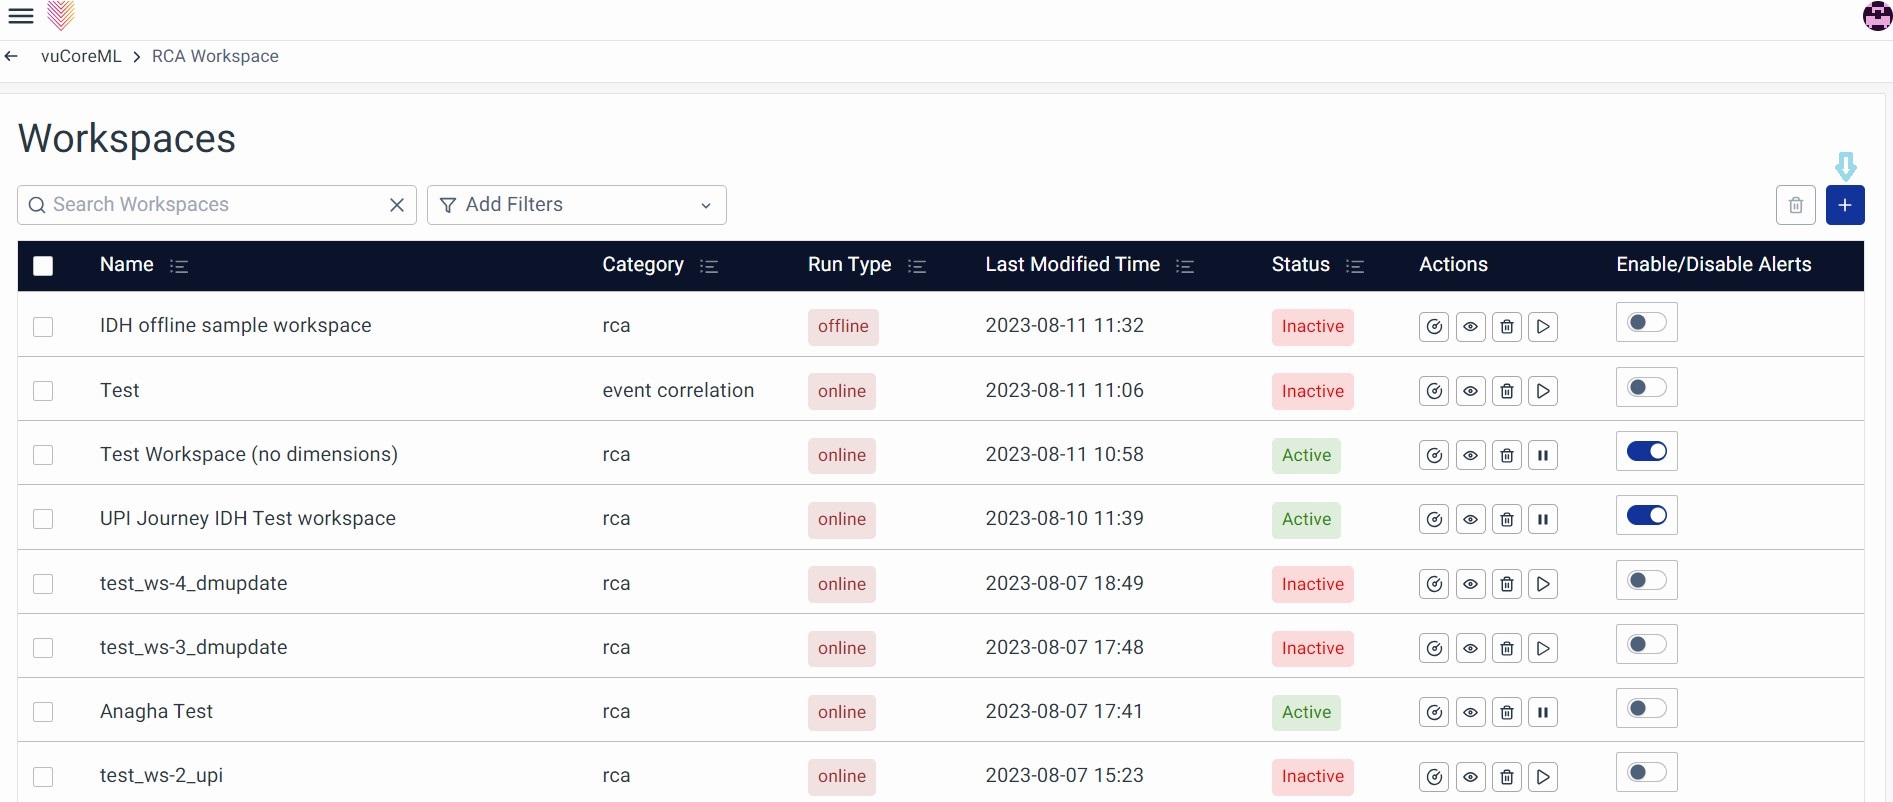
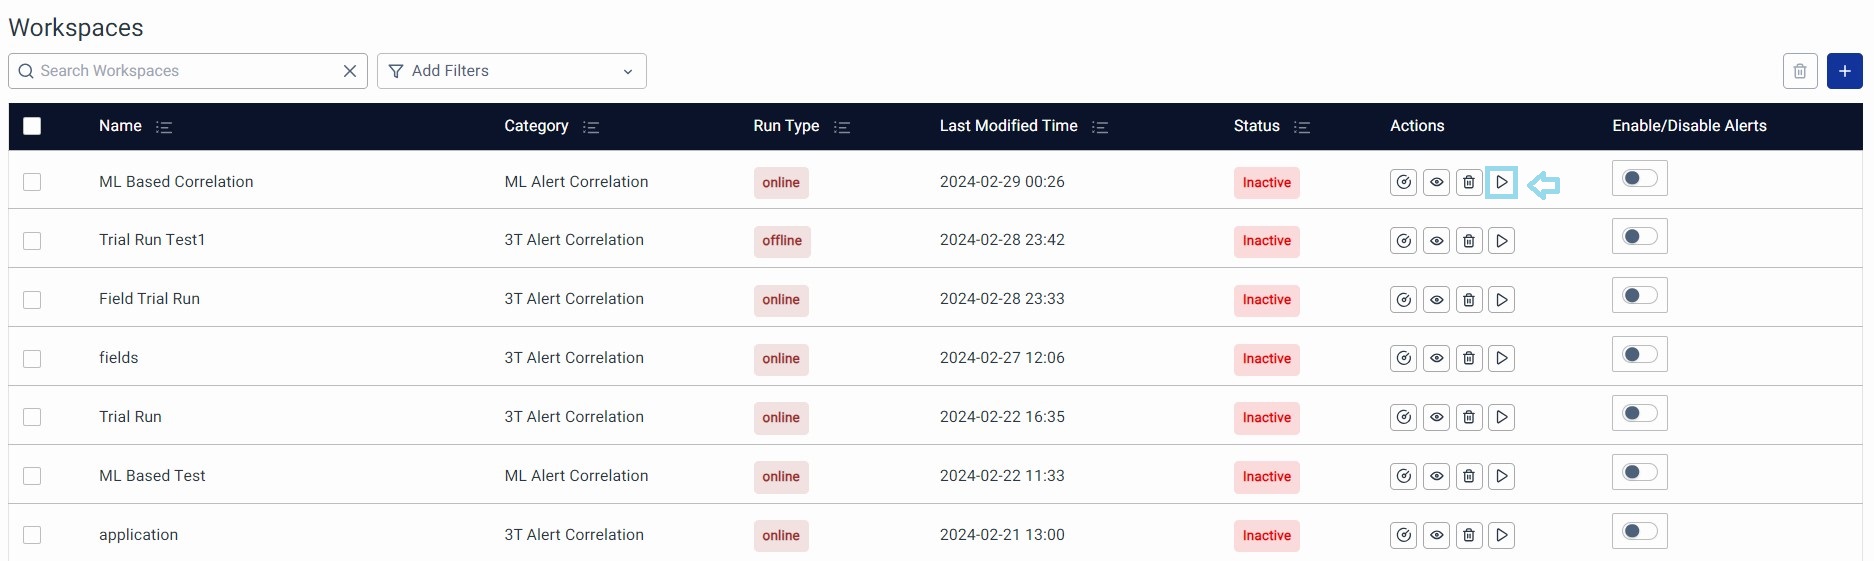
- Name: Identifies the name of the workspace, typically clickable for configuration viewing.
- Category: Indicates the selected category among RCA, Time Series Analysis, 3T Correlation, or ML Correlation.
- Run Type: Specifies whether the workspace processes online or offline data, displaying either 'Online' or 'Offline'.
- Last Modified time: Displays the timestamp of the last modification made to the workspace.
- Status: Indicates whether the workspace is active or inactive.
- Actions: Provides options to View Incidents, Edit Workspace, Delete Workspace, and Activate or Deactivate the Workspace.
- Click View Incidents to navigate to the RCA Incidents page for detailed insights.
- Select Edit Workspace to make necessary adjustments.
- Use Delete Workspace to remove the workspace.
- Toggle Activate or Deactivate to enable or disable the workspace
- Enable/Disable Alerts: Toggle to enable or disable alert notifications for the respective workspace.
Create Workspace: The workspaces page shows a list of previously configured Workspaces. Click on the + icon to create a new Workspace.
You can now configure the workspace; the workspace comprises 3 major sections
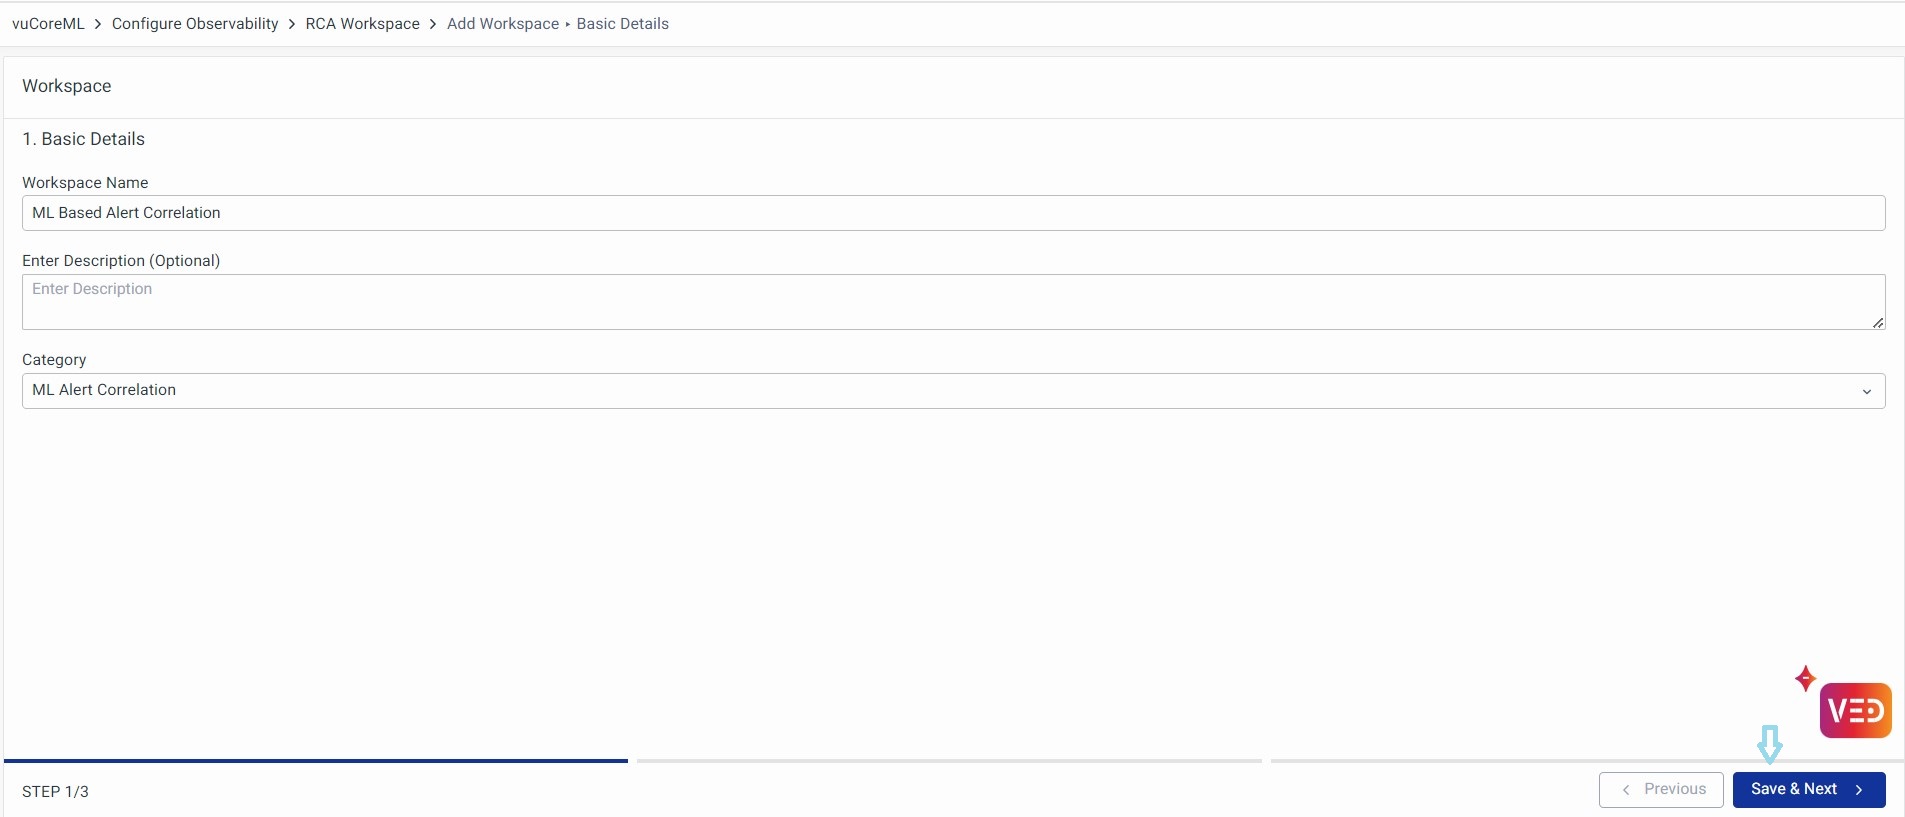
Basic Details
Enter the Workspace Name, Description, and select the Category as ML Alert Correlation. Click on Save and Next to create the Workspace.
Event Sources
Once Workspace is created, you will be directed to the Event Sources page, where you can add events by selecting the Event Data Model.
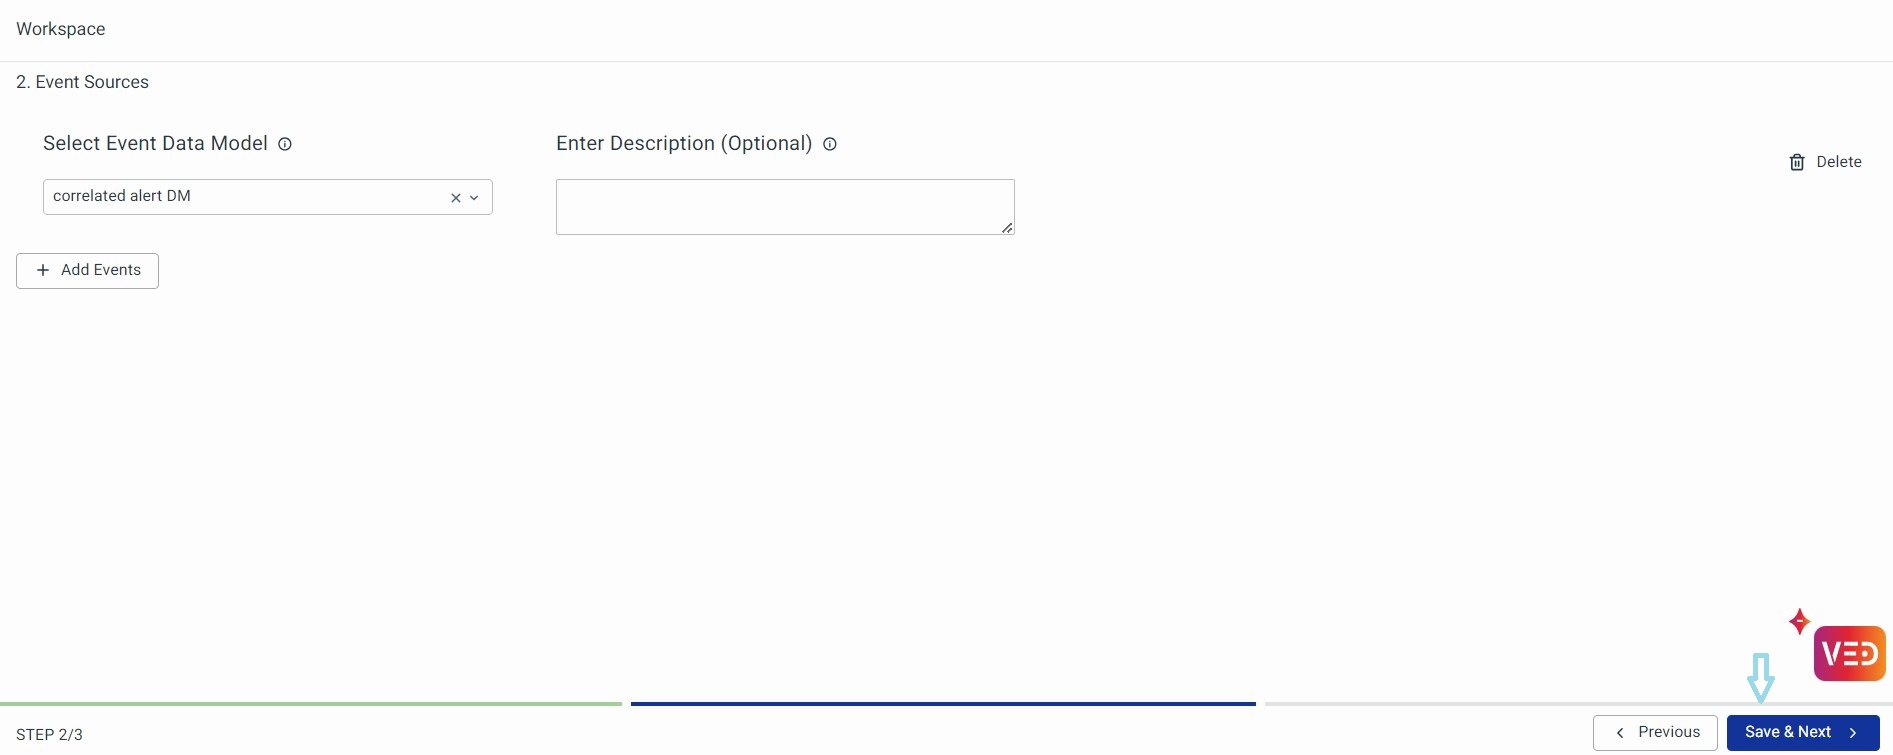
- Select Event Data Model: Choose a Data Model from the drop-down.
- Enter Description (Optional): Provide an optional description.
- + Add Events: You can add multiple events by clicking on the + Add Events button
- Delete: Click on the Delete button to delete an Event Data Model
Click on Save and Next to move to the next step.
Settings
After successfully configuring Event Sources, you will be directed to the Settings page.
It has 4 major sections.
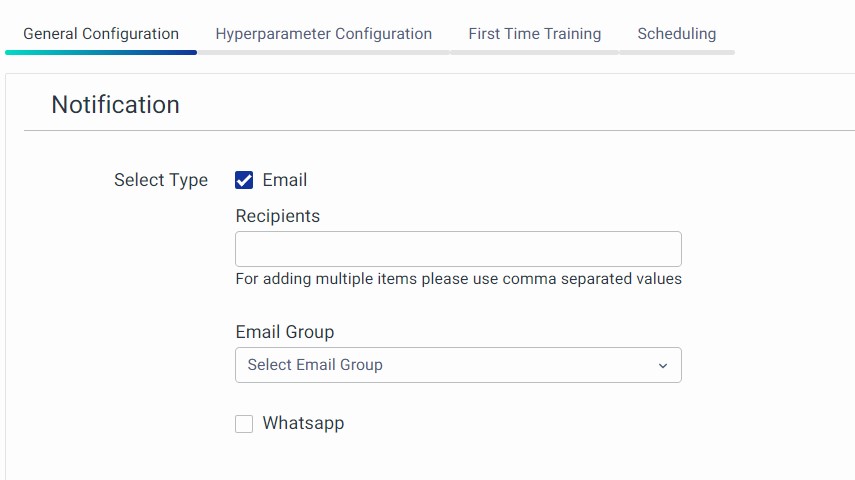
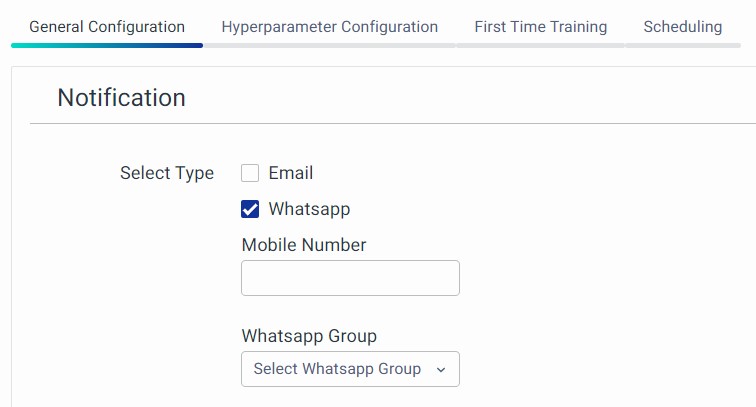
General Configuration
This is the first section and it allows you to configure notification types. It supports Email and WhatsApp notifications.
Email: Enter the Recipient's email address. Use commas to add multiple IDs. You could also add an Email group to notify a set of people.
WhatsApp: Enter the Recipient's mobile. Additionally, you can add a WhatsApp group to notify a set of people.
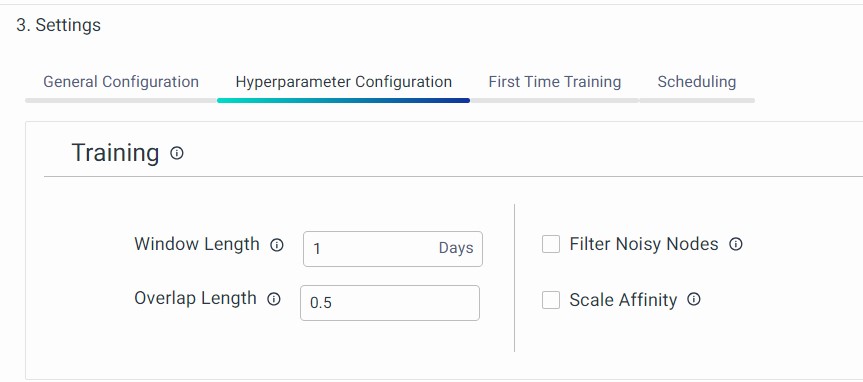
Hyperparameter Configuration:
This is the second section of the Settings page. It has 2 main segments - Training and Inference.
- Training: The training phase learns from data to create and adapt rules based on which events/alerts are to be correlated. The hyperparameters listed here can be tuned and they have a direct effect on the rules that the algorithm creates.
-
Window Length: The length of the window in days within which events will be considered for learning the clusters. Default to 1 day. The training will be done in a scheduled fashion.
-
Overlap Length: the length of the window in days by which to have an overlap between event data for two consecutive days. Default to 0.5 days. Overlap helps to reduce end-of-day cut-off effects.
-
Filter Noisy Nodes: Events from nodes that frequently generate non-meaningful events will be filtered out before clustering and marked as such.
-
Scale Affinity: If true, a 0-1 scaling is applied to the affinity matrix which is internally estimated by the correlation engine. Scaling prioritizes larger cluster formation while sacrificing slight information on graph node closeness. Enable this if you often see smaller non-meaningful correlated events.
-
Inference: The inference phase utilizes the rule created during training to correlate events in real-time. The hyperparameters listed here can be tuned and they have a direct effect on the correlated events/alerts that are created.
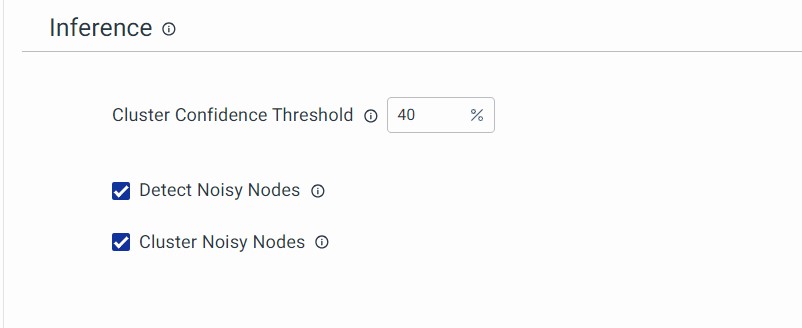
- Cluster Confidence Threshold: Clustering rules having lesser confidence than the threshold will be deprioritized when generating correlated events. Defaults to 40% which is a good default. Higher confidence can only be achieved when the correlation engine is enhanced with feedback. Hence, setting a high value here may result in low to no correlated events getting created.
- Detect Noisy Nodes: Select this option to detect nodes that frequently generate non-meaningful events
- Cluster Noisy Nodes: Select this option to cluster events from nodes that frequently generate non-meaningful events
A new user may choose to leave the default settings unchanged
First Time Training
This is the third section of the Settings page. You must choose the start time and end time of the data that must be utilized to train the algorithm.
Please select the larger range of data for the first run so that the algorithm can learn the rules.
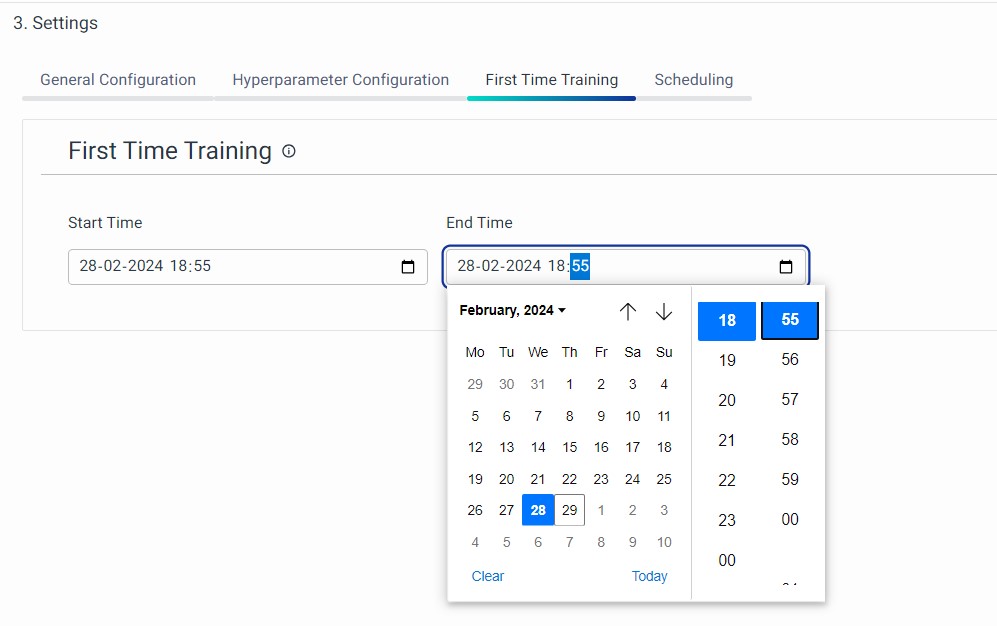
The larger the data training the more the algorithm will take a significant amount of time to learn the rules.
Scheduling
This is the last section of the settings page. The event correlation algorithm runs in a scheduled fashion. You can use this page to adjust how frequently training and inference jobs must run.
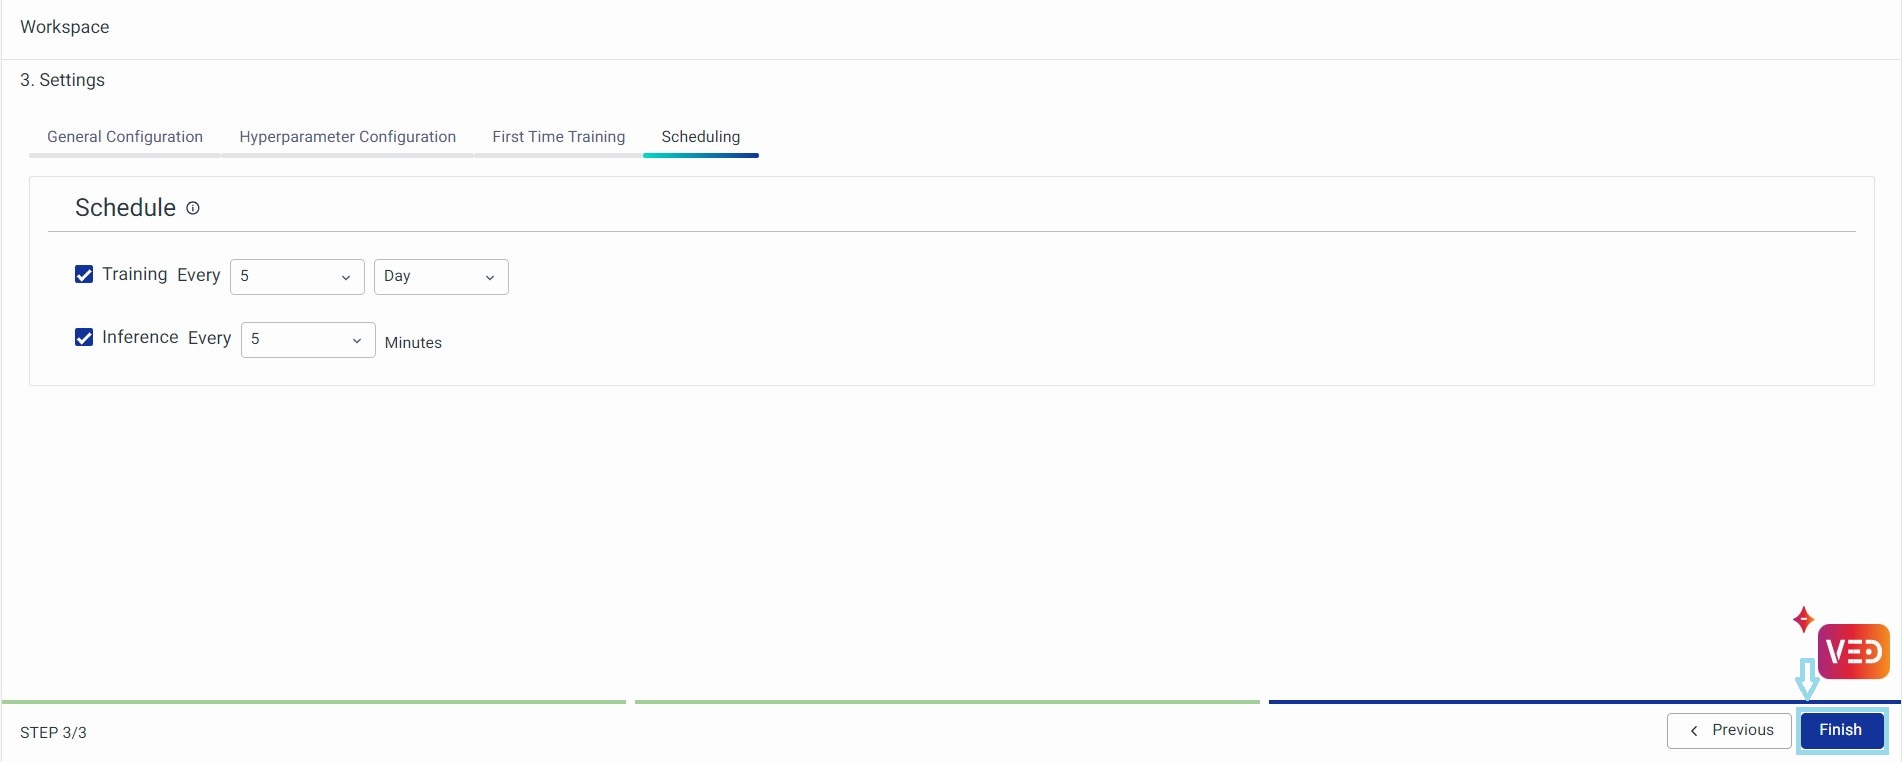
Finish
Click on the Finish button to complete the ML Alert Correlation configuration. And, you will arrive back at the listing page. Click on the Activate Workspace button from the Actions column.
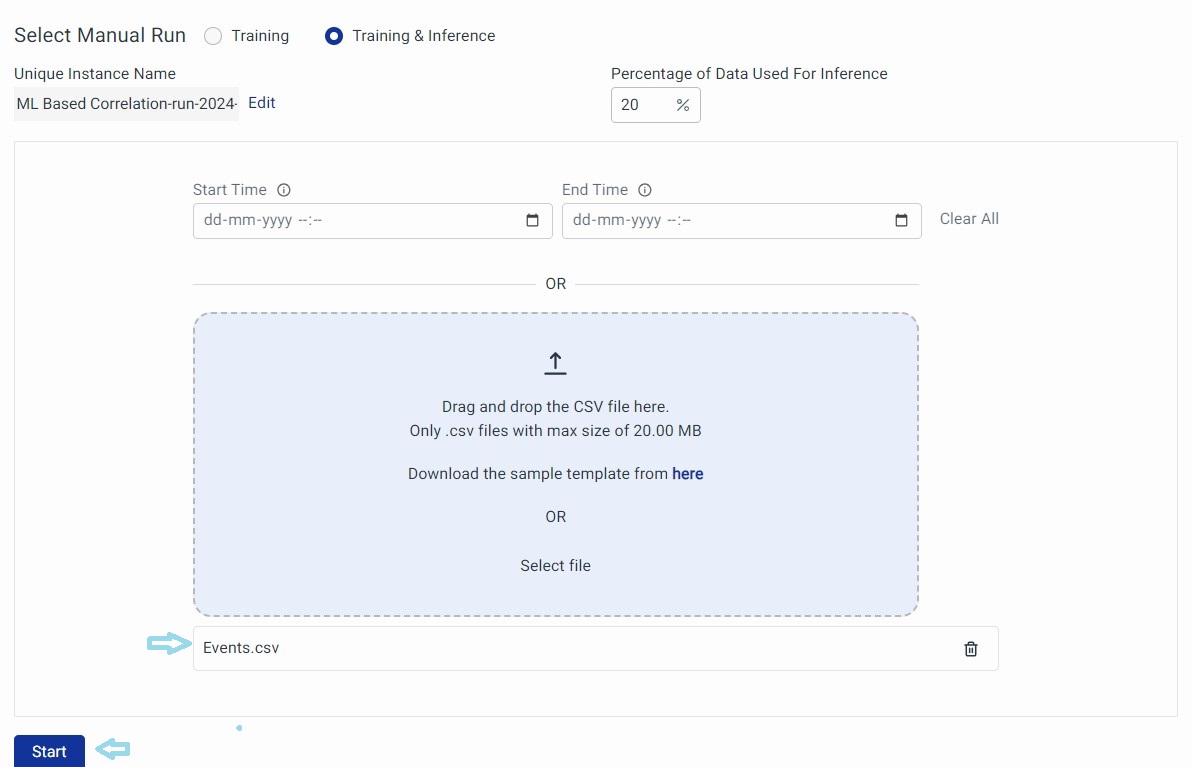
Choose the ‘Start Time’ and ‘End Time’ within which events will be considered for Training or Training and Inference. Click on the Start button to begin. If you choose Training and Inference, choose the percentage of the Data used for Inference.
The inference phase utilizes the rule created during training to correlate events in real-time.
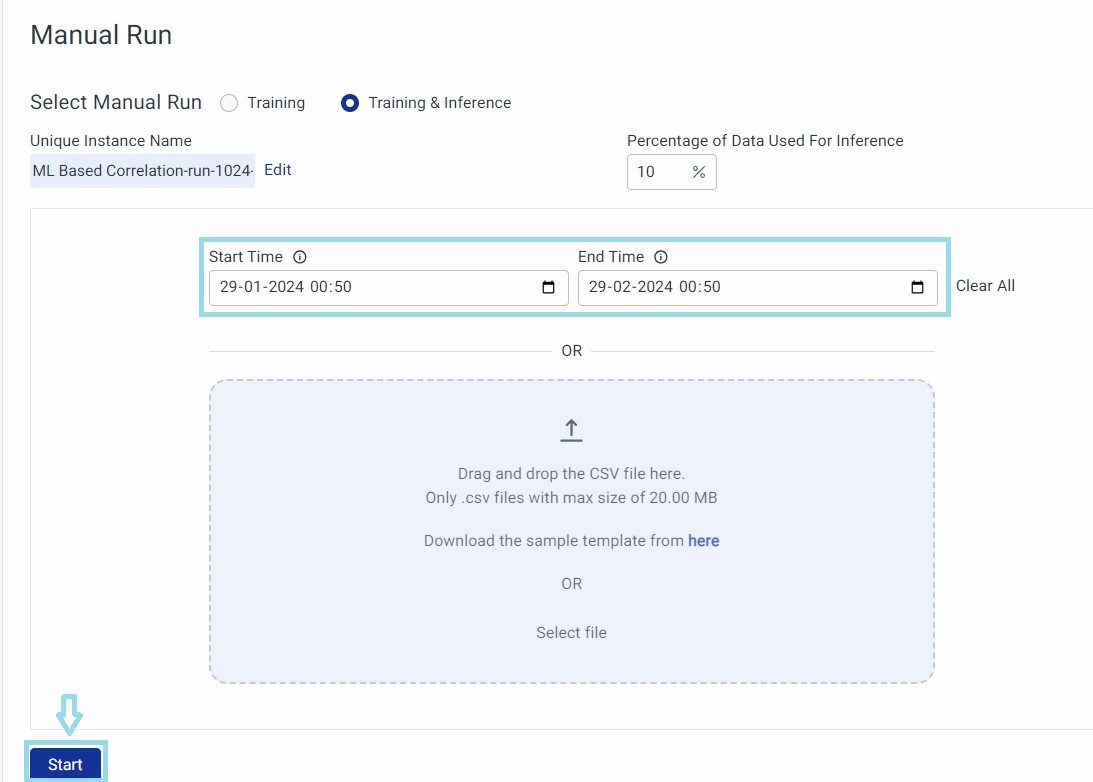
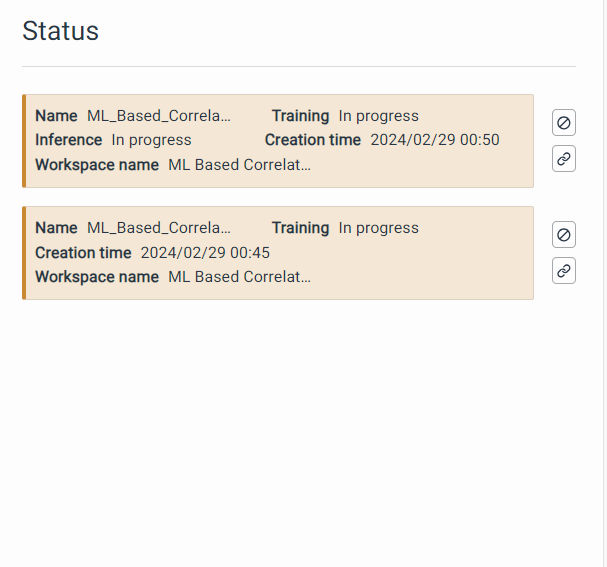
You will find the training and inference happening in the Status window. To view the results you can click on the link-like button that will take you to the Alert Console and display the results.
Alternatively, you can upload a CSV file to correlate the events and click on the Start button.