Roles
Roles refer to a collection of users who are granted specific permissions. It is to be noted that permissions are assigned to Roles and not to individual users.
On the Roles listing page, users with appropriate permissions can create, edit, delete, and modify the permissions of Roles.
- The users with view-only permissions for the User Management module can only see the Roles listing and view the permissions assigned to them.
- For environments with LDAP integrations, customers should create LDAP roles specific to vuSmartMaps, ideally prefixed with "Vunet-". This ensures that only relevant roles are pulled during LDAP synchronization, minimizing unnecessary role imports.
Role Creation
To create a new Role, click on the + button on the Roles listing page.
This will open a new page where you can enter a Role Name and select a list of users that you want to add to this group.
Also, the user role-specific homepage can be set here under Select HomePage. A specific dashboard can be set as the default landing page for this particular user role for the web app as well as for the mobile app.
Additionally, you can set the Data Access Policy to provide granular data access controls for user roles. The details on the Data Access Policy are discussed here in detail.
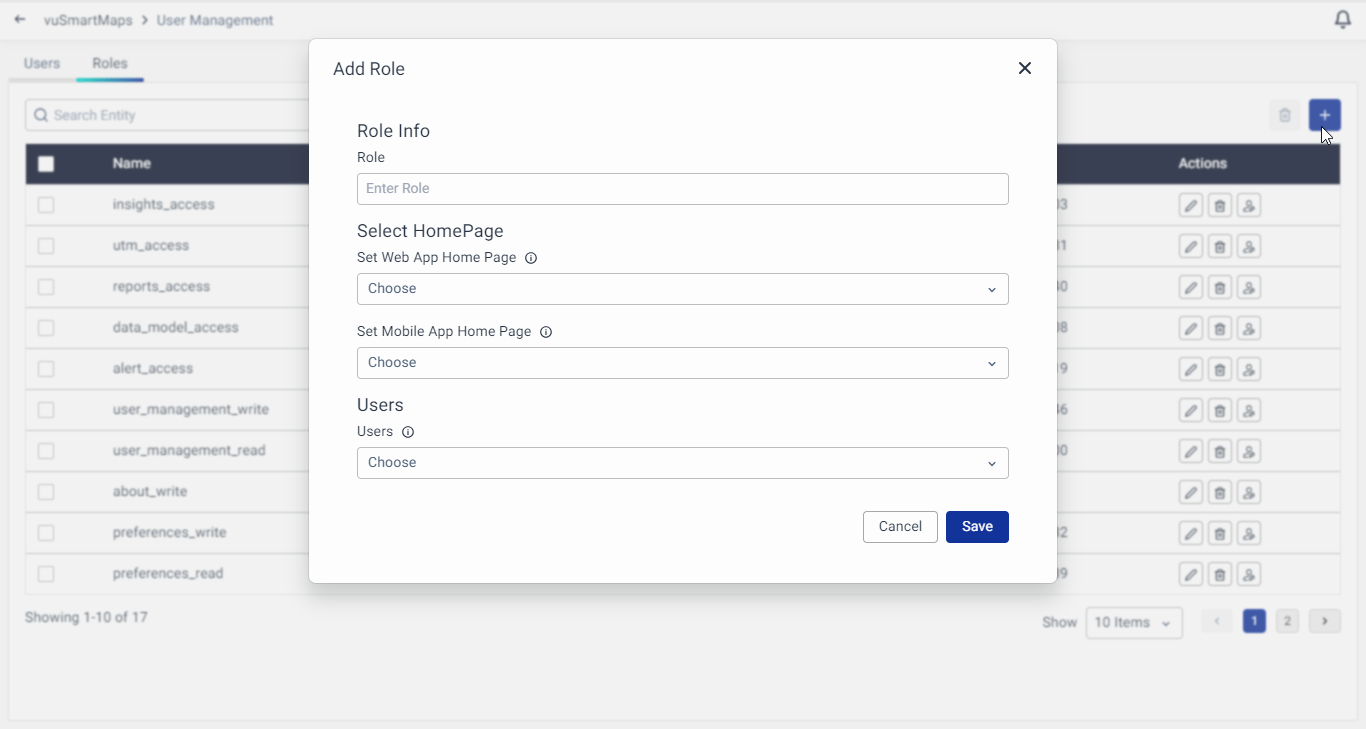
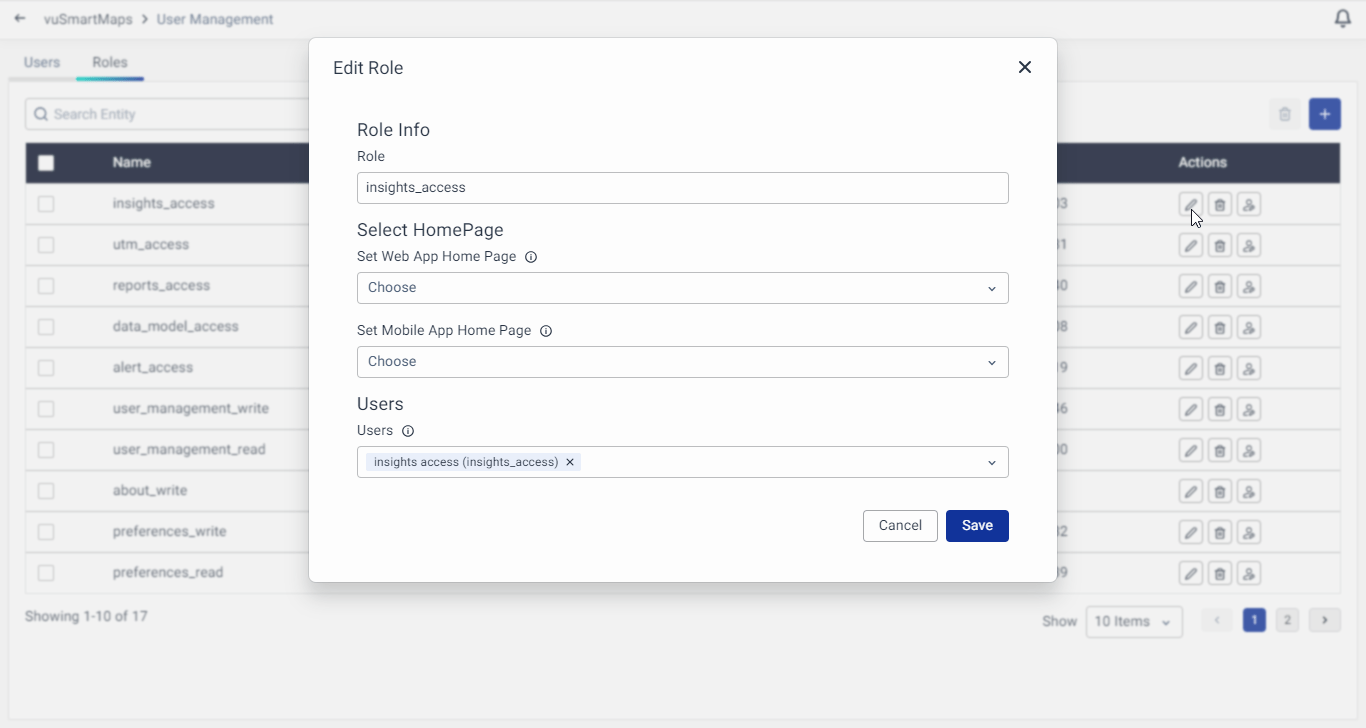
Alternatively, you can link users to Roles from the Edit Role section.
Once you have entered all the required information, click on the Save button to create the new Role.
Assign Permissions to a Role
To assign permissions to a Role, select the Role to which you want to grant permissions and click on the Edit Role Permissions icon, as shown below:
When you click on the Edit Role Permissions icon for a Role, a modal will appear displaying a list of modules and the permissions that can be assigned to each module.
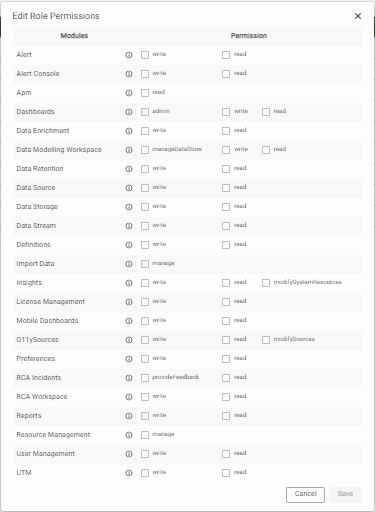
After selecting the appropriate permissions, click on the Save button located at the bottom of the modal to save the configuration for the Role.
-
Please note that when you grant 'write' permission to a module for a Role, the corresponding 'read' permission is also implicitly granted for the same module.
-
Additionally, giving permission to one module may result in implicit permission being granted to another module. For example, granting ‘write' permission to the Alert Rules module will also implicitly grant 'Data Model' read permission to that Role.
The below snapshot shows one example, where the selection of Alert Write permissions, grants read permissions for that module automatically. And similarly also grants read permission for Data Model.
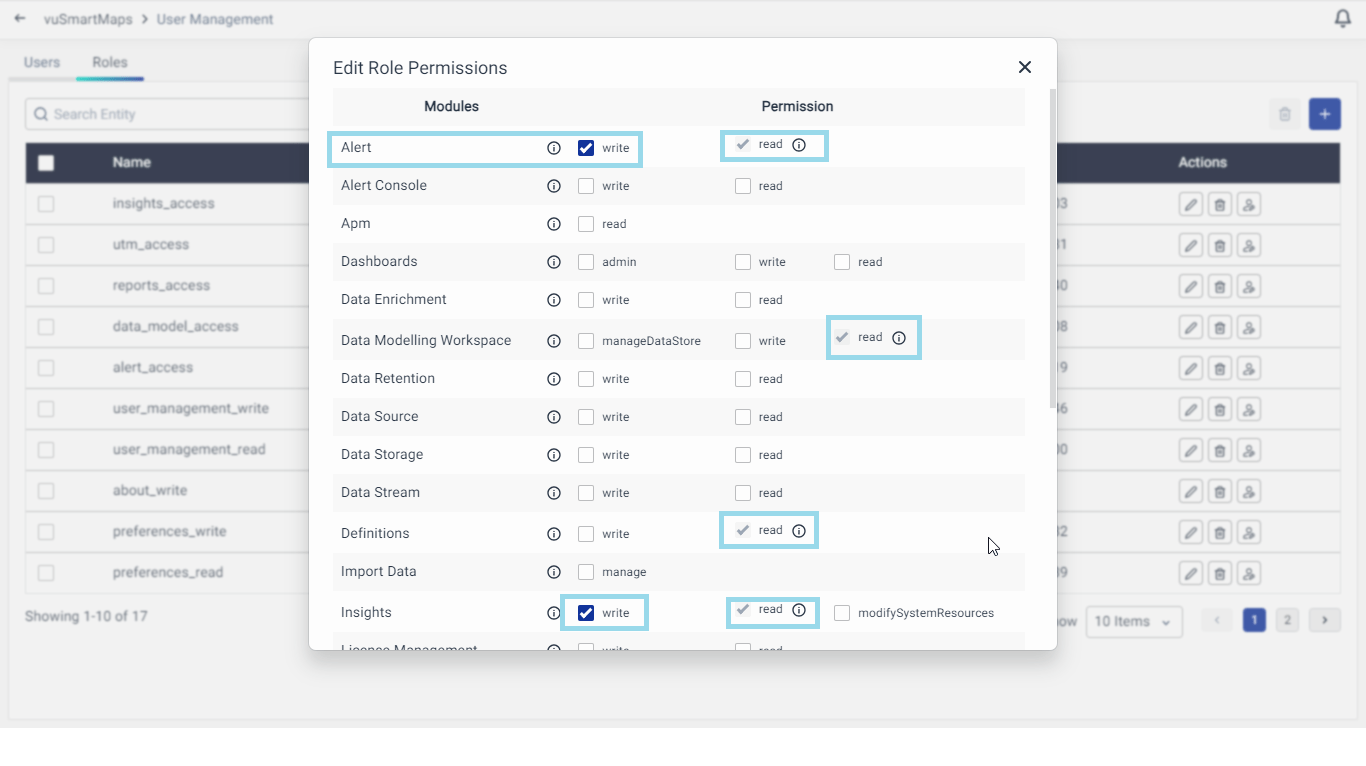
Logging in with such a user will give access to that user with a read-only view of the Data Modelling workspace.
Managing Password Change Permissions
In vuSmartMaps, administrators now have the ability to control password change permissions for end users, ensuring tighter security measures and compliance within the platform. This user guide section outlines how to utilize this feature effectively.
Enabling Password Change Permissions:
- Within the Edit role settings under Roles, locate the 'Miscellaneous' permission category.
- Enable the 'changePassword' rule under this category to allow password changes for users assigned to this role. Deselect the option to disable password change. It is to be noted that this option is enabled by default.
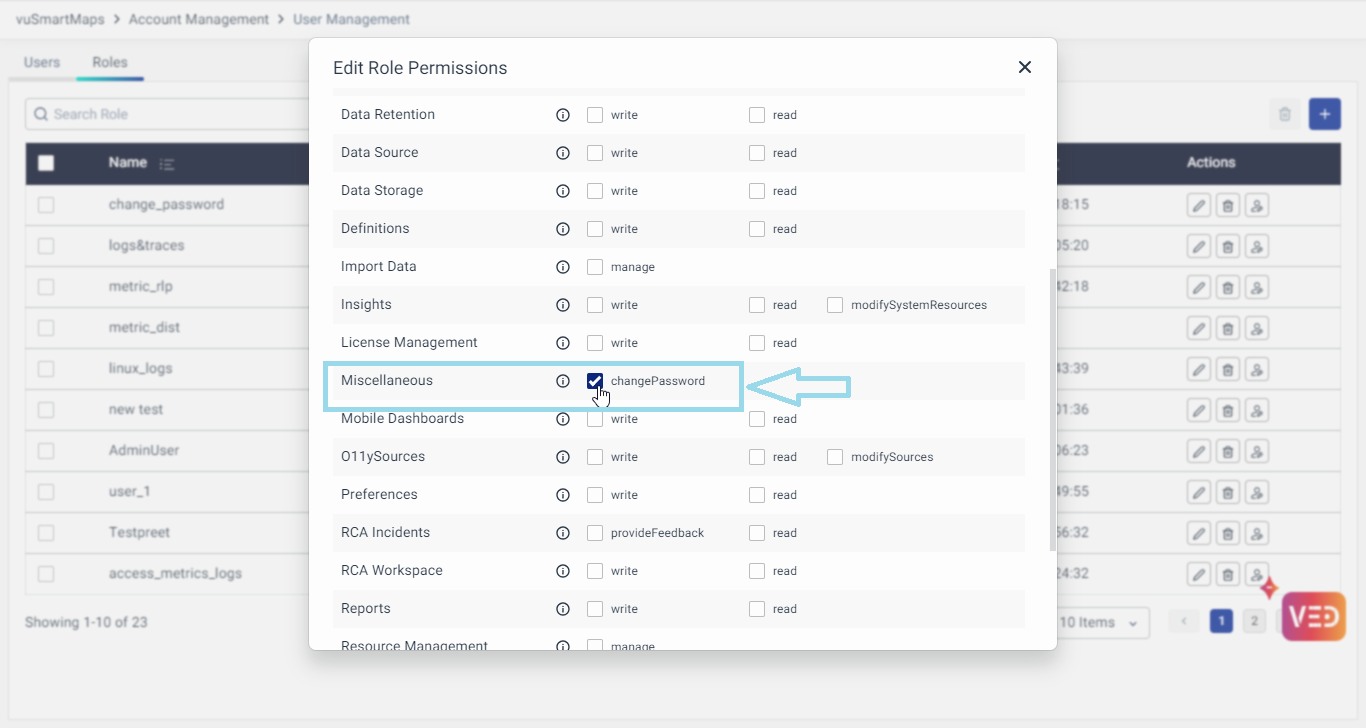
- After configuring the permissions, save the role settings to apply the changes.
- Users assigned to roles with the Change Password Permission will be able to update their password with the Change Password option.
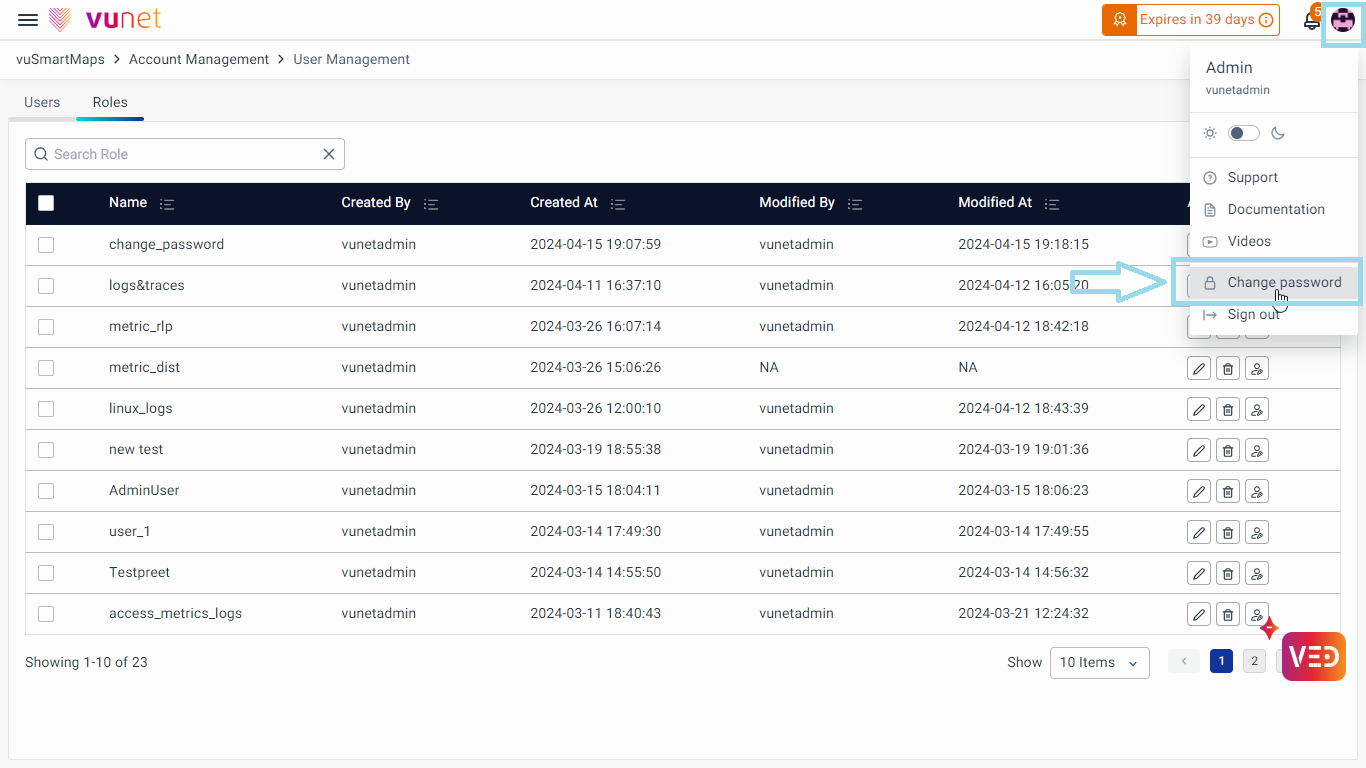
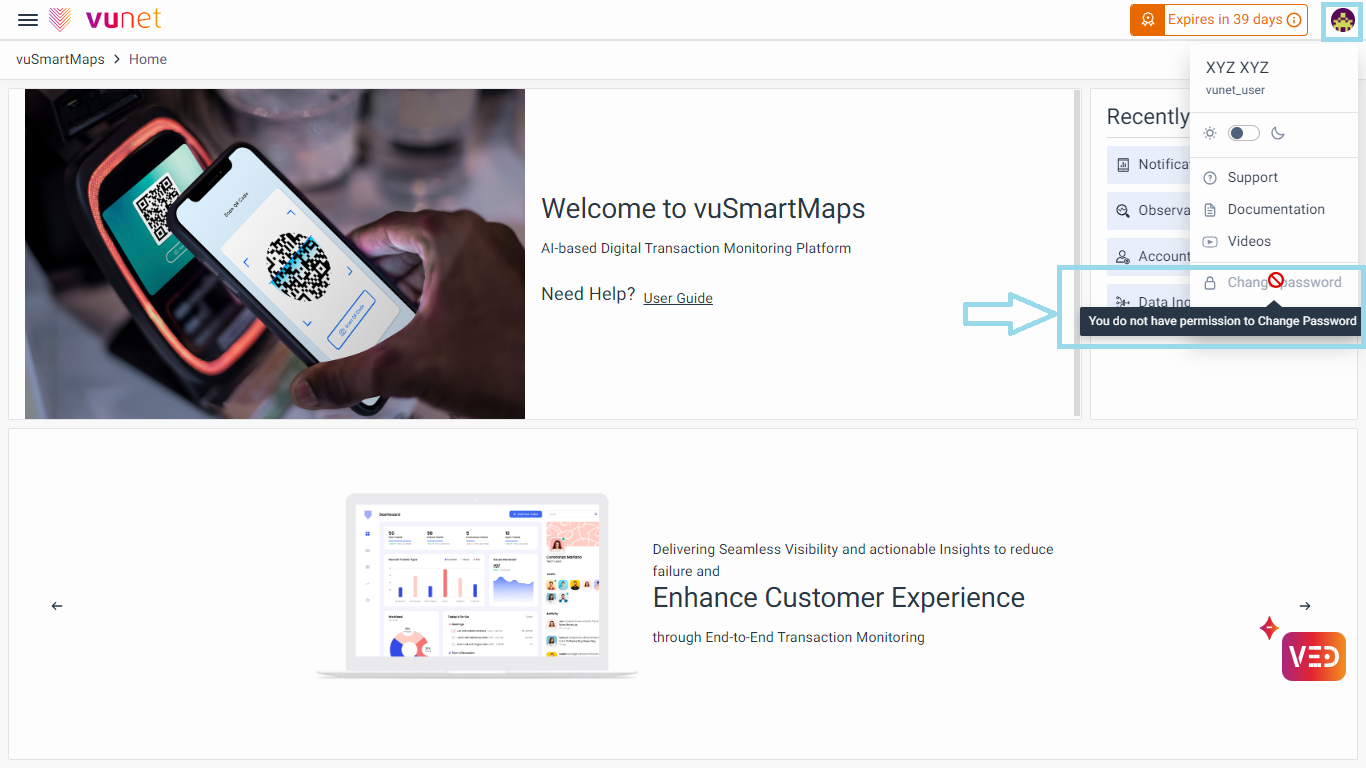
- Users assigned to roles with the Disabled Change Password permission will find the Change Password field disabled in their profile section upon login. Hovering over the disabled field will display a message informing the user that they do not have permission to change their password.
Updating Role’s Default Homepage and Users
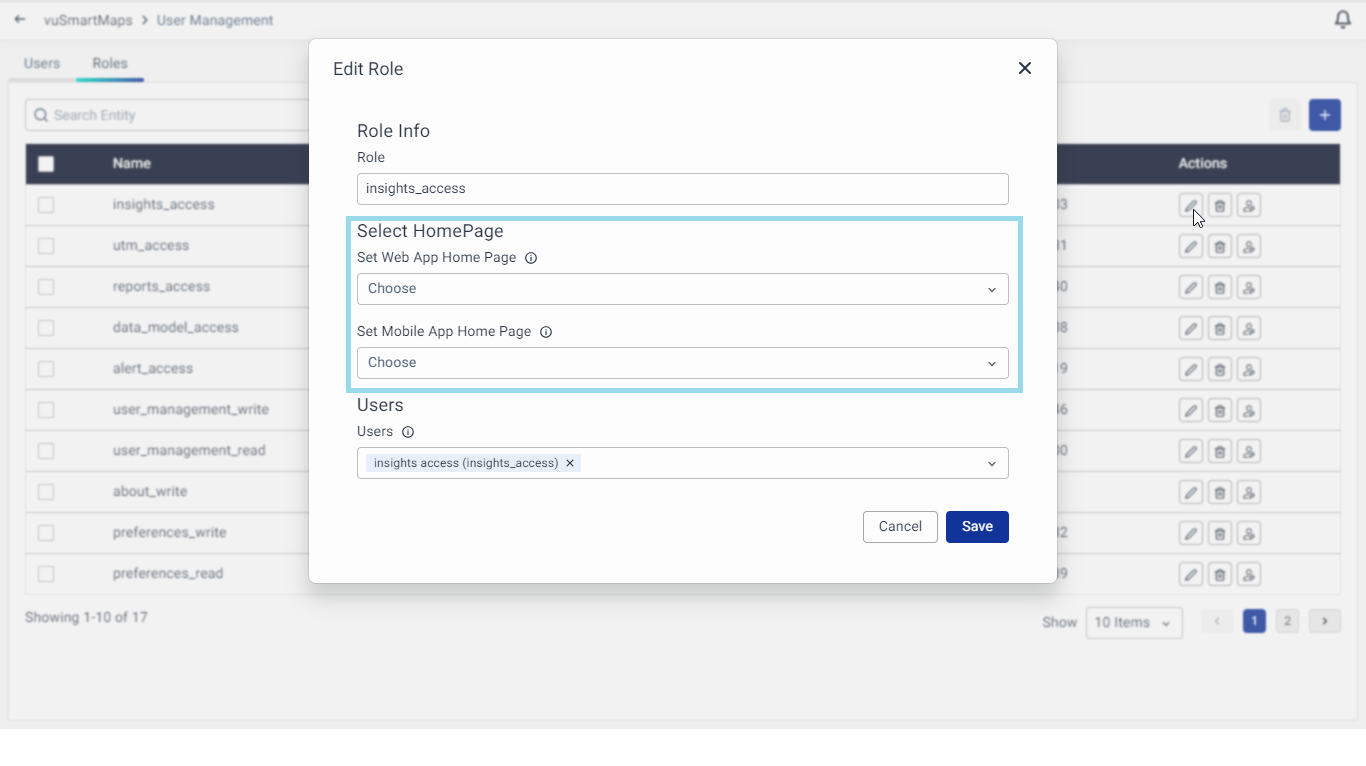
In user management, you can set a specific homepage for each user role. This means that when a user with a specific role, logs in, they will be directed to a personalized dashboard that suits their role. You can choose a different dashboard for the web app and the mobile app if desired.
- To update the default landing page, you can edit the role by clicking on the Edit button.
- On clicking the Edit button, a pop-up will open, where you can modify the preference for the homepage for the web app and mobile app under Select HomePage. Similarly, Users can also be updated for the role from this pop-up on the Edit screen. Clicking Save will update the details for the specific role.
Roles Deletion
To delete specific Role(s), follow these steps in the User Management module:
-
Locate the Roles(s) you wish to delete and select the checkbox next to their names.
-
Click on the Delete Roles icon.
-
A pop-up window will appear, asking you to confirm the deletion of the selected user(s).
-
In the pop-up, type "Yes" in the provided text box to confirm the deletion. Click on the Delete Roles button.
-
The selected Roles will be deleted.
-
Similarly, to delete some particular user, the Delete Role Icon can be used across that particular user.
Please note that any user with write permissions to the User Management module has the ability to delete any Role.
Object-Level Permissions
Enhance security and control access with ease using the improved permission management feature in vuSmartMaps. With object-level permissions, you have the ability to define precise access rights for specific objects in Alerts, Dashboards, Data Models, Insights, Log Analytics, Reports, and UTM. This means that only authorized users within designated roles can view, modify, or delete specific objects within these modules. By implementing object-level permissions, vuSmartMaps ensures better data governance and provides you with greater control over user actions and access levels. Safeguard your sensitive information and enjoy the flexibility to manage user permissions effectively with vuSmartMaps.
To manage permissions for specific objects, navigate to the respective feature's edit menu and click on the Permissions button. From there, you can select the appropriate permissions (View, Modify, or None) for each role.
Object-Level Permissions and Bulk Permission Management
Enhance security and control access with ease using the improved permission management feature in vuSmartMaps. With object-level permissions, you can define precise access rights for specific objects in Alerts, Dashboards, Data Models, Insights, Log Analytics, Reports, and UTM. This ensures that only authorized users within designated roles can view, modify, or delete specific objects within these modules. By implementing object-level permissions, vuSmartMaps enhances data governance, providing you with greater control over user actions and access levels. This helps safeguard sensitive information and offers flexibility in managing user permissions effectively.
Benefits of Bulk Permission Management:
- Efficiency: Allows administrators to assign permissions to multiple objects at once, significantly reducing the time and effort involved in managing permissions for a large set of objects.
- Centralized Management: All object permissions are managed from a single interface, providing better oversight and control.
- Seamless Access Control: Ensures consistent permissions across multiple objects and modules, while simplifying the process of managing complex permissions structures.
Managing Object-Level Permissions
To manage object-level permissions, users can assign permissions to specific roles within each object in the relevant modules. Permissions can be set to control access for different actions such as View, Modify, or None, providing fine-grained control over what each role can do with each object.
Bulk Permission Management for All Objects
Bulk Permission Management enables administrators to efficiently manage permissions for multiple objects across various modules from a single interface. This feature is especially useful when assigning permissions to new roles or when managing permissions for a large number of objects.
Only users with the appropriate permission to manage bulk permissions will have access to this feature. For users without this permission, the Edit Object Permission button will be disabled.
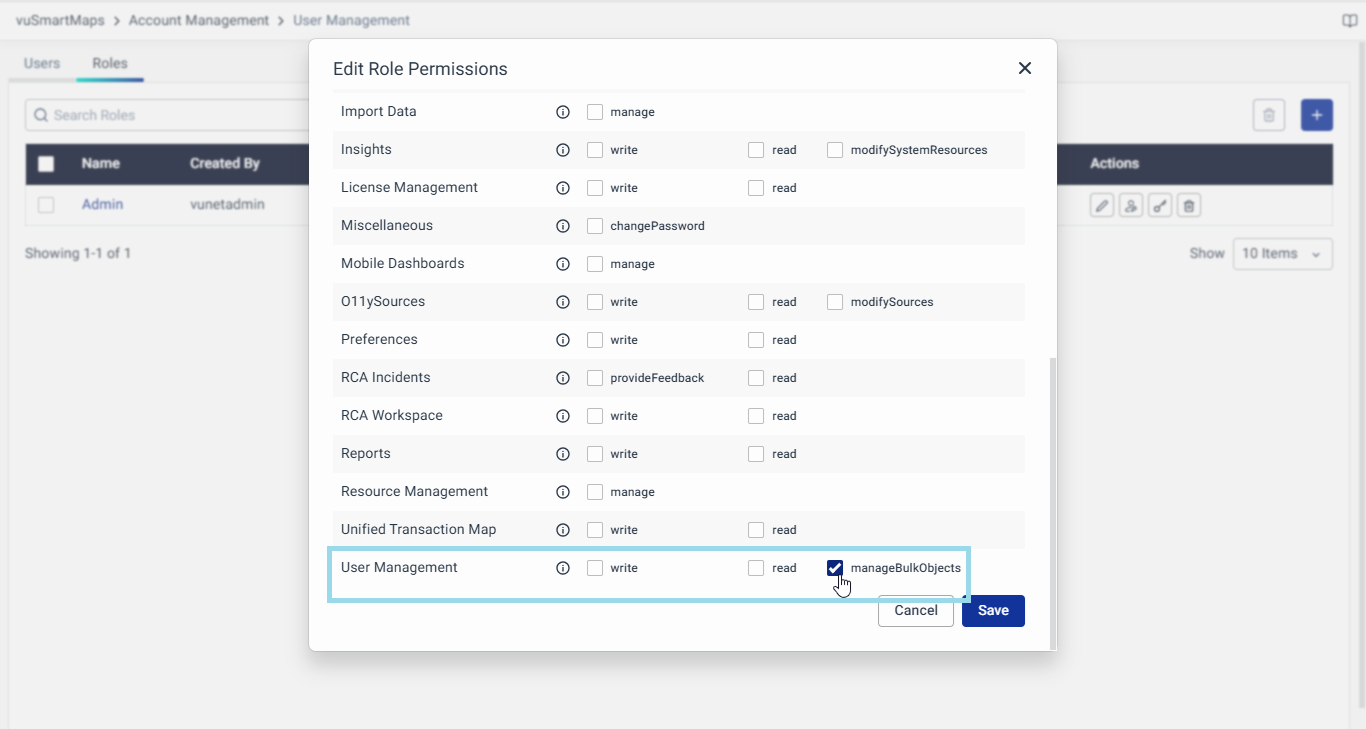
The object permission can be managed by clicking on Edit Object Permissions button on Roles tab under Actions column.

- Viewing All Objects:
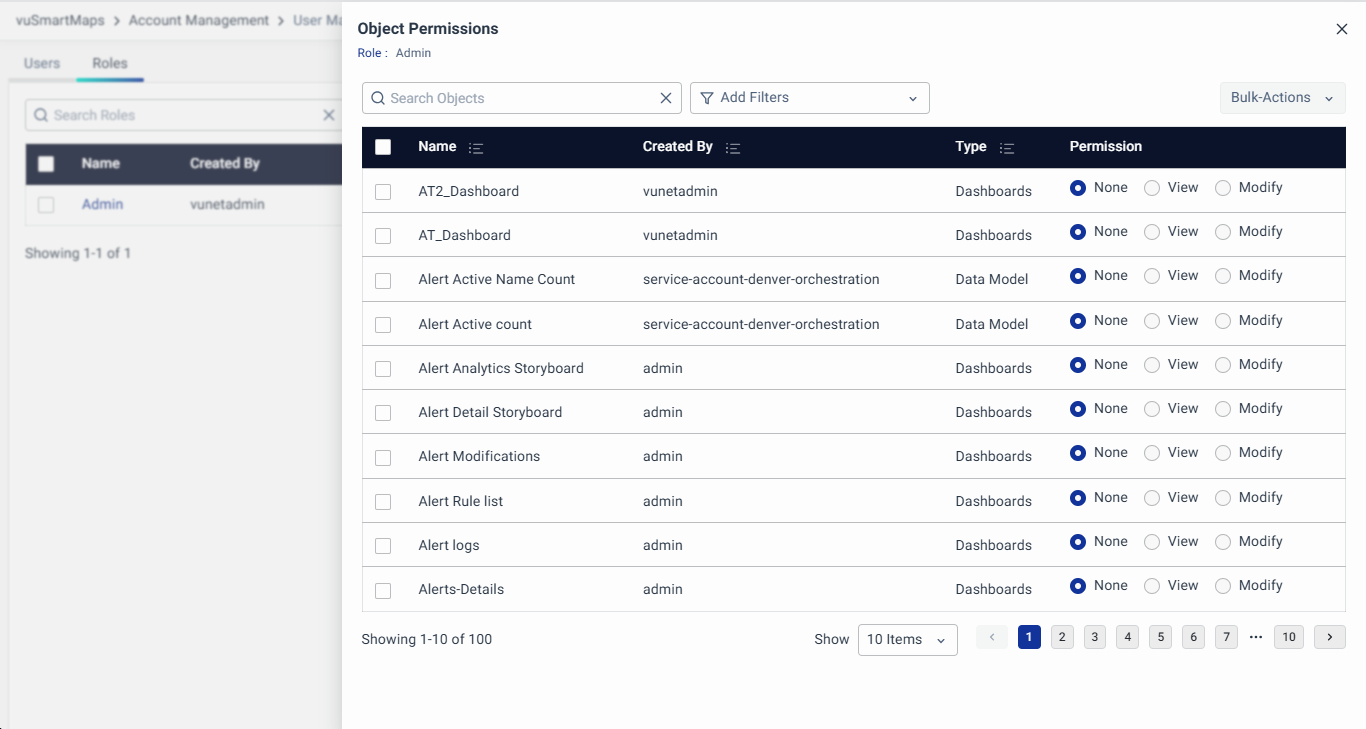
- All objects across different modules (Alerts, Dashboards, Data Models, Insights, Log Analytics, Reports, and UTM) are listed in a centralized view. The objects are categorized by their respective modules for easy identification.
- Each object displays key details, including name, type, and current permissions, giving administrators a clear overview of object access.
- Searching and Filtering Objects:
- The system provides a search bar to search for objects by object name, object type, or created by. This allows users to quickly find specific objects across modules.
- Additionally, filters can be applied to narrow down the list of objects based on various criteria, such as module type, permission level, and created by. This helps users focus on specific sets of objects.
- Pagination is available to handle large datasets, ensuring smooth navigation through extensive lists of objects.
- Selecting Multiple Objects:
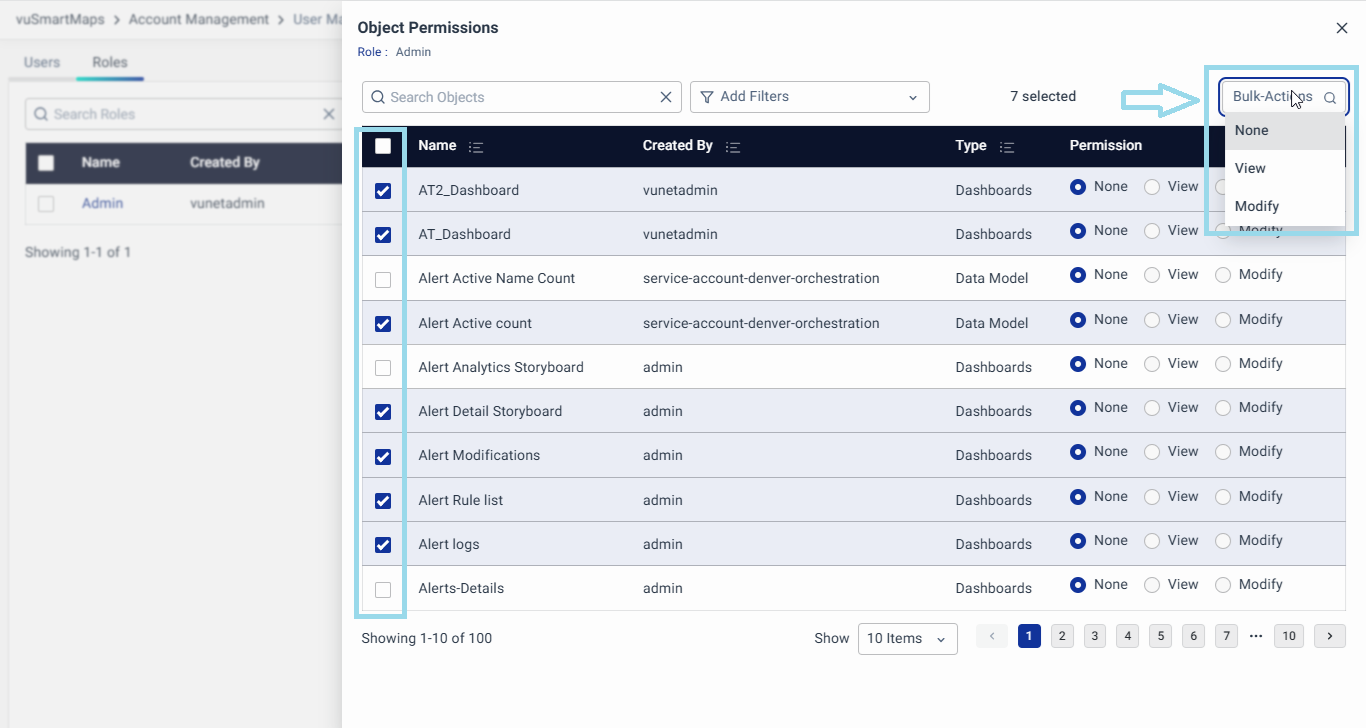
- Administrators can select multiple objects at once by checking the corresponding boxes next to each object. This selection enables bulk management of permissions, reducing the time needed to configure permissions for many objects at once.
- Assigning Permissions in Bulk:
- After selecting multiple objects, administrators can assign permissions to all the selected objects simultaneously. The system supports different permission types (View, Modify, or None) for each role, and permissions can be applied across all selected objects.
- This functionality ensures that users can manage access efficiently without having to assign permissions individually for each object.
- Implicit Object Permissions:
- Implicit permissions are supported for certain modules. For example, when permissions are applied to Alerts, UTM, or Insights, their respective Data Models will automatically receive read access. Similarly, if permissions are applied to Reports, both the associated Data Models and Dashboards will be granted read access. For Dashboards, if they are selected, the associated UTM, Insights, and their respective Data Models will also receive read access.
- Example: When UTM permissions are applied, the associated Data Model will automatically receive read access. Similarly, applying permissions to a Report will automatically grant read access to both the Data Model and associated Dashboards.
- Implicit permissions are supported for certain modules. For example, when permissions are applied to Alerts, UTM, or Insights, their respective Data Models will automatically receive read access. Similarly, if permissions are applied to Reports, both the associated Data Models and Dashboards will be granted read access. For Dashboards, if they are selected, the associated UTM, Insights, and their respective Data Models will also receive read access.
- Bypassing RBAC Restrictions:
- Administrators with the permission of manageBulkObjects can bypass standard RBAC restrictions and list all objects for permission assignments. However, objects that are associated with the admin’s own modules will only be visible or manageable if the admin has been explicitly granted access to those objects.
- This ensures that administrators have the ability to manage permissions at scale, while still maintaining appropriate access controls.
- Saving and Reviewing Permissions:
- After assigning permissions, a confirmation summary is displayed, allowing administrators to review the permissions assigned to each object and role.
- Administrators can make further adjustments or remove permissions as needed through the bulk permission management interface.
