Creating Alerts
The following guide explains the whole workflow and you can configure the steps between Simple, Compound, and Programmable Alerts.
Accessing Alerts
You can create as many alerts as needed in vuSmartMaps. The system will periodically evaluate these alerts and generate alert notifications when the conditions are evaluated to True. These alert notifications are sent through the configured channels for each alert and send notifications when the conditions are met.
vuSmartMaps Alerts can be accessed by navigating from the left navigation menu (Configure Observability > Alerts).
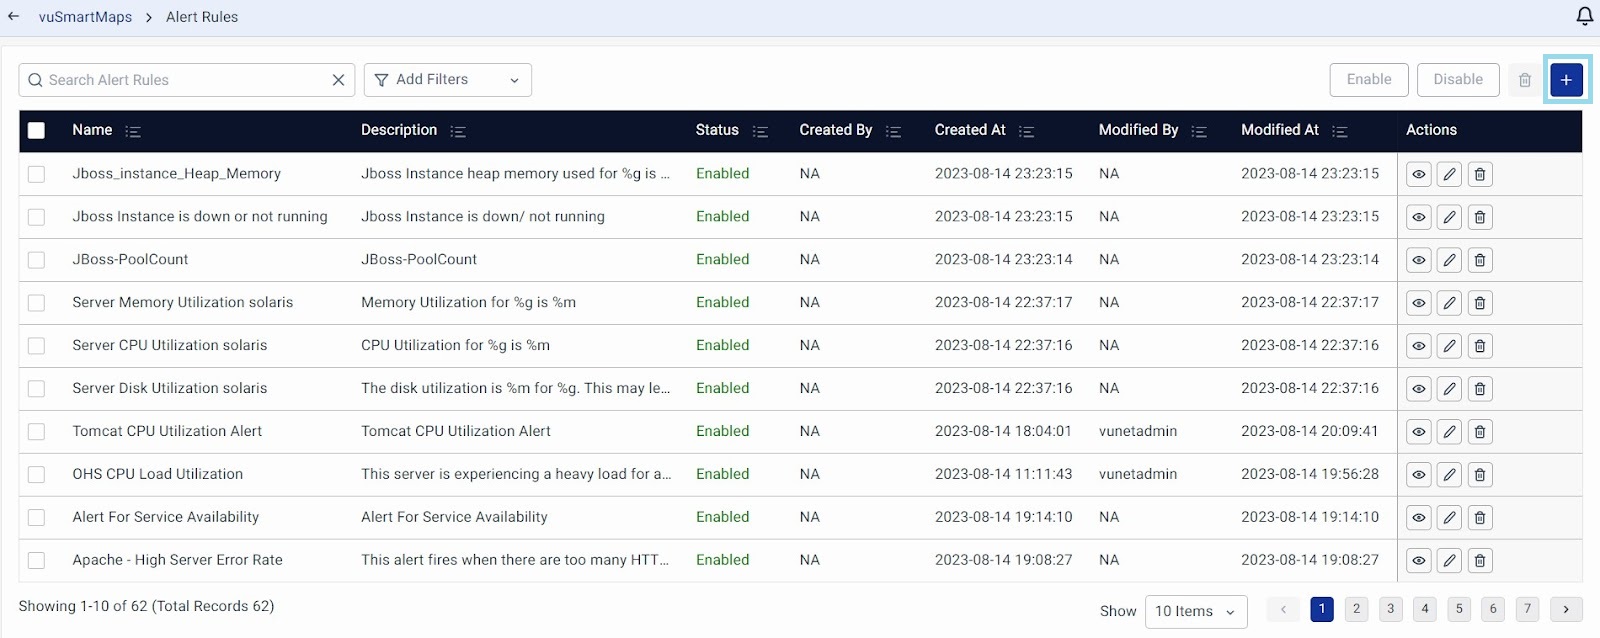
- Name - The name of an Alert Rule.
- Description - The description of the Alert Rule.
- Status- Describes whether the alert is Enabled or Disabled.
- Created By - The information on the user who created the Alert Rule.
- Created At - The information on the date and time when the Alert Rule was created.
- Modified By - The information on the user who modified the Alert Rule recently.
- Modified At - The information on the date and time when an Alert Rule recently was modified.
Simple Alert Creation
You can set up a Simple Alert by entering the Basic Details and configuring a single Data Model. To create a new alert rule click on the + button and follow the steps below.
Step 1. Basic details
Use this section to configure the descriptive contents of the notifications generated based on this alert.
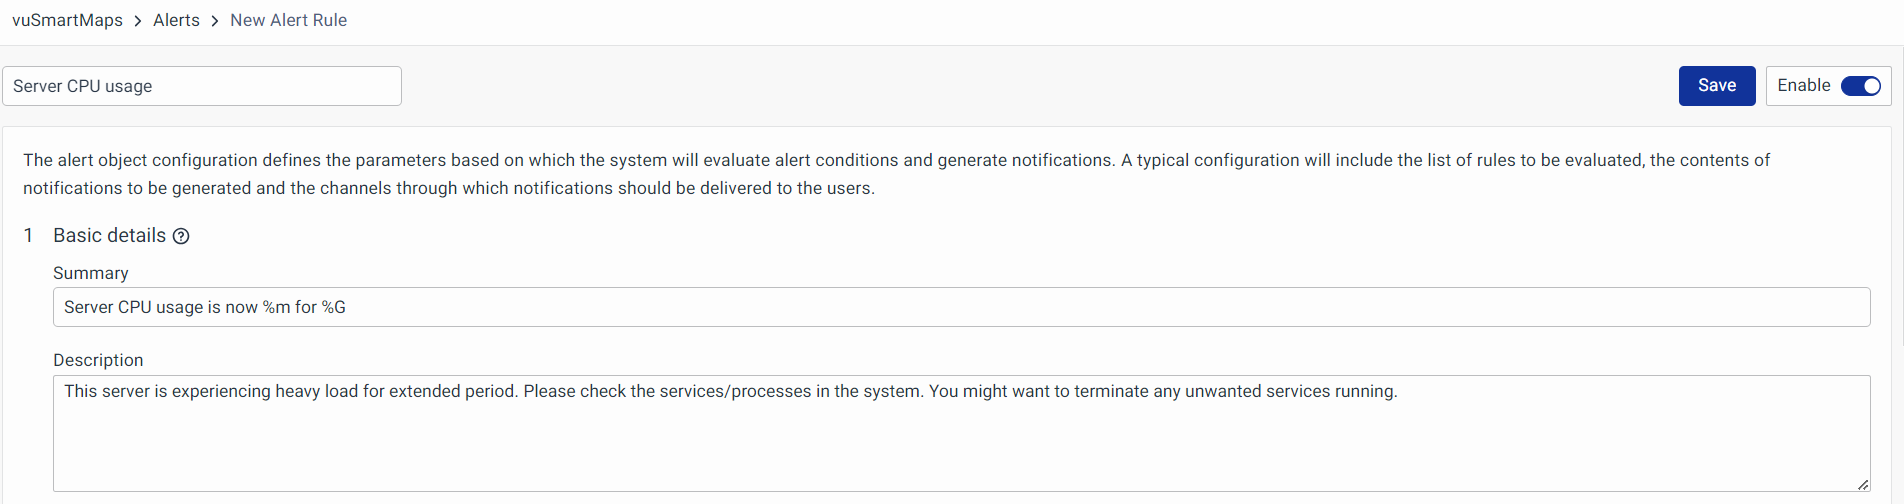
- Summary: Contents filled in here will be used as the subject field in the notification email generated and the summary field in the notification document.
- Example: "Link Status Down", "CPU Usage High"
- Description: Contents filled here will be present in the description field of the notification generated. It is recommended to use this field to give a detailed explanation of the alert and recommended corrective steps and best practices.
- Example: "This server is experiencing heavy load for an extended period. Please check the services/processes in the system. You might want to terminate any unwanted services running. If the condition persists, you might want to consider increasing the CPU/Memory resources allocated to the server."
Portions of Summary and Description fields can be dynamically formed using contents from the actual alert document. Use the format specifiers for this purpose. For example, configuring Summary as "Server CPU usage is now %m for %G" will result in alert notification to contain summary as "Server CPU usage is now 76% for host:1.1.1.1"
Supported format specifiers are:
- %G - Add Group by parameters and their values Example: "Alert observed for %G" will result in "Alert observed for process:apache of host:micmac"
- %g - Add only Group by parameter values. Example: "Alert observed for %g" will result in "Alert observed for apache of micmac"
- %M - Monitoring parameters along with its values. Example: "Monitoring parameter %M" will result in "Monitoring parameter cpu_usage:18.2"
- %m - Only monitoring parameter values. Example: "Monitoring parameter value observed=%m" will result in "Monitoring parameter value observed=18.2"
- %S - Add severity information. Example: "%S: CPU Usage High" will result in "Critical: CPU Usage High"
Step 2. Data Models to be alerted on
vuSmartMaps allows users to model their data using a Data Modelling workspace which can then be used for alerting. You can configure one or multiple data models and convert any business logic to alerts.
Select a Data Model from the list based on the requirement and the time for which the Data Model is to be evaluated.
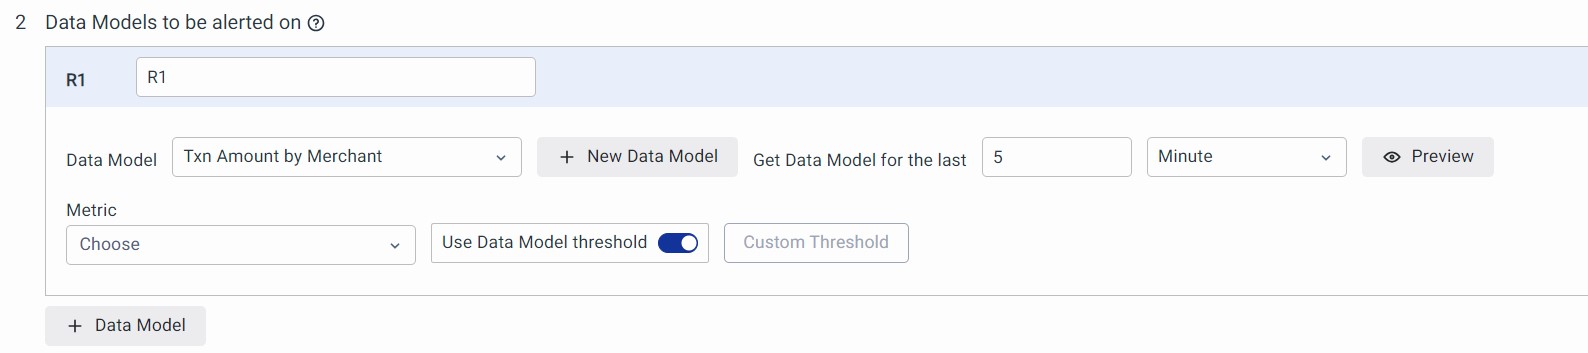
- R1 or Rule Name: Provide a name for your alert rule.
- Data Model: Enlists all the available Data Models. You can choose one of them as per your requirements. Click on the + New Data Model button to create a fresh Data Model.
- Get Data Model for the last: Choose the time slot as required from minutes through years.
- Preview: Preview Data Model shows a snapshot of the data contained within the Data Model for last 15 mins
- Metric, Duration, Threshold: For the selected Data Model, select the 'Metric' against a threshold value. You can use the Data Model Threshold by default. You can manually set up the threshold but it overrides what is configured in the Data Model.
- + New Data Model: To add a new Data Model, click on ‘+ New Data Model’. It will take you to the Data Modelling Workspace for creating a new Data Model..
- Information Collection: When a rule is marked as Information Collection, the results of the rule are not used to decide whether a notification should be generated.
- Instead, if a notification is generated based on other rule conditions, data from this rule is included in the notification. For example, this can be used to include Top 5 processes consuming CPU when a notification is generated for system CPU usage above the threshold rule.
- The first rule is always used for generating notifications, hence the 'Info Collection Only' option is hidden for this. However, for other rules, you can mark it as per your requirement. It will usually be the last rule(s) configured.
- Please note that the values from the information rule are available in the evaluation script as well and can be used in business logic implementation.
Compound Alert Creation
Include the previous steps from Simple Alert Creation, that is, Basic Information and Data Models and continue to configure Logic Conditions explained further.


When using multiple rules, here's what to keep in mind:
- The buckets in the first rule should also be in the second rule.
- The second rule can have additional buckets, and the third rule should include all the buckets from the second rule.
- Example: If we want to get the alerts for high CPU usage of the process which has the CPU usage above 95 percent for the server which are down.
- The first rule will have the server IP as the bucket in its data model, the second rule will have the server IP as the first bucket and the process name as a second bucket.
- When creating Data Models, ensure the order of the buckets is the same.
- Alerts will only be executed when all the rules are true; otherwise, the alerts won't trigger.
- Rules that don't have 'Info collection only' checked participate in the alert decision and if there is no logic condition or evaluation script created, all alert rules should be evaluated to True to generate the alert notification.
Example: This alert fires when too many HTTP requests (>3%) with a response status between 400 and 599.
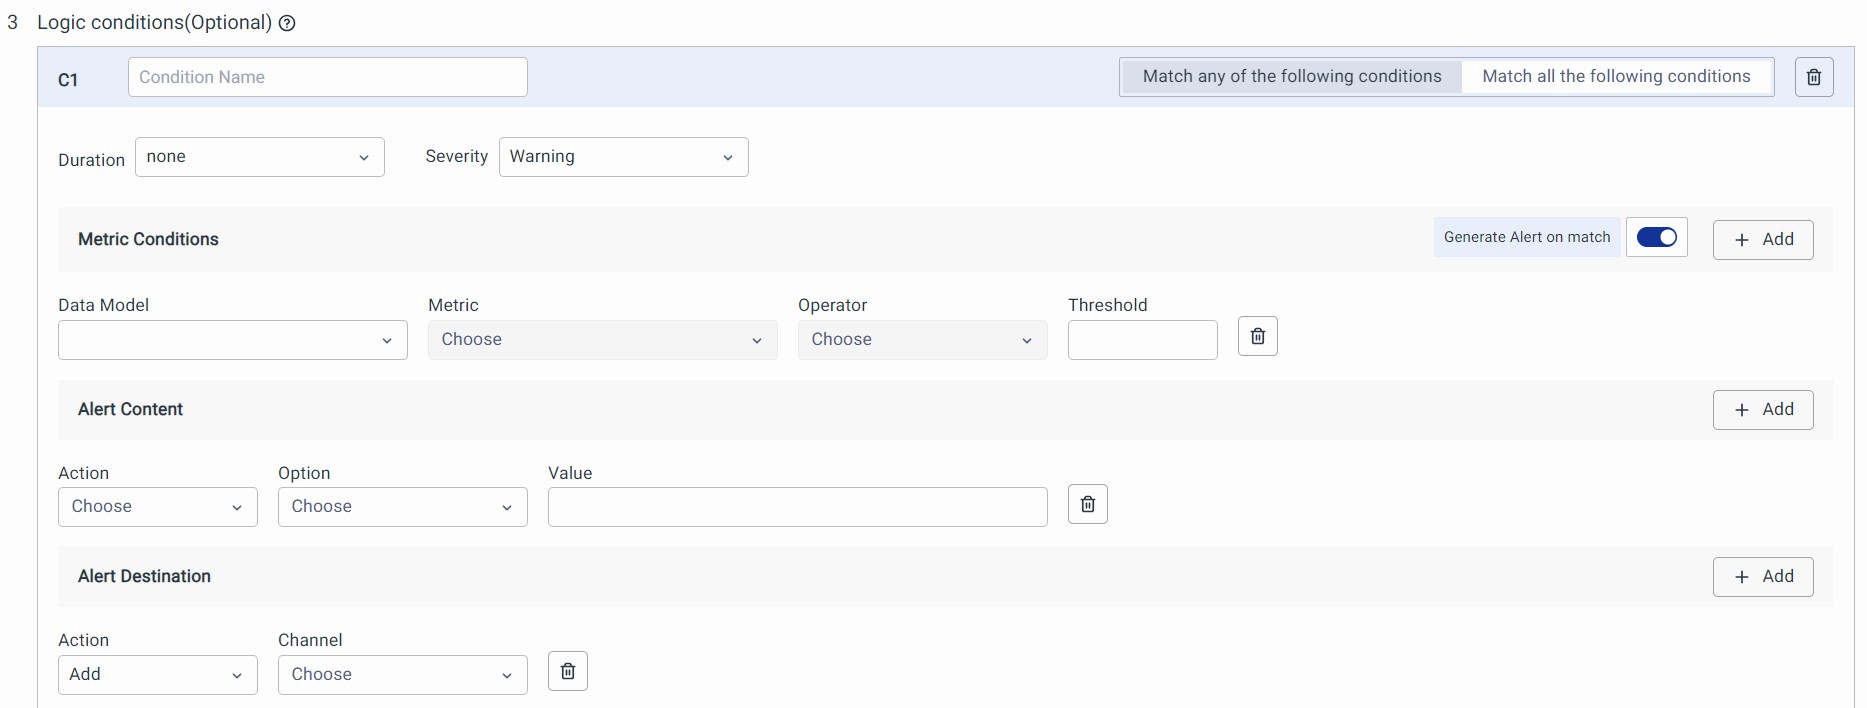
Step 3. Logic Conditions (optional)
Alert notification behavior and notification contents can be modified using the conditions specified here. For example, based on the value of a metric (Metric Condition), you can decide on the email recipients for a notification.
Based on the metric condition, duration, and/or severity of the alert, three types of controls are possible:
- Decide whether an alert notification should be generated
- Modify the contents of the notification
- Modify the notification channels to be used and individual recipients within the channel

- C1 or Condition Name: Optional name for the logic condition. This can be configured to represent the purpose of this block.
- Match all the following conditions: When selected, actions configured in this block are executed by the system, if all the conditions specified here are satisfied.
- Match any of the following conditions: When selected, actions configured in this block are executed by the system, if one of the conditions specified here is satisfied.
- Generate Alert on Match (toggle): If it is enabled then the alert notification is generated when either one condition is True, or all conditions are True.
- Alert Content: Actions listed here are used to modify, remove or add fields in the notification. This will only occur if the alert engine triggers the alert using the conditions in this block.
- Alert Destination: Modifications listed here will be applied to the notification channels and recipients. This setting will overwrite the Alert Channel configuration.
The evaluation conditions configured here are executed from top to bottom. The system stops the execution as soon as a condition matches. There are 3 kinds of conditions available in the logical blocks.
- Duration: This is the time duration for which the alarm has been active. And this condition returns True if the duration alert has been active is greater than the value configured here.
- Severity: This returns True if the severity of the alert notification is equal to or more than the one configured by the user. Severity is categorized as Critical > Error > Warning > Information with ‘Critical’ being more severe and ‘Information’ being least.
- Metric Condition: This is a combination of one or more conditions based on the data models specified by the users in the Rule section. Only the Data models specified in the Rule section can be used here. All the metric conditions have an AND relationship among them
All three conditions can have an AND or OR relationship among them based on the Match all the following conditions or Match any of the following conditions flags.
Alert Evaluation Conditions:
In some cases, you might need more control over how your alert rule behaves beyond the basic settings like thresholds and alert channels. This is where alert evaluation conditions come in.
For example:
- Your base alert rule for monitoring transaction failures notifies the operator in charge. But if the issue persists, you might want to notify a larger team or follow an escalation process.
- If the transaction failure rate exceeds a certain value, you might want to add a special tag to the notification to highlight it in dashboards.
You can configure these additional conditions, as shown in the snapshot below.
As can be seen in the screenshot, the user can configure
- A list of condition blocks
- Each condition block has a list of conditions section and actions section.
- A list of comparison rules. A condition block is selected if the list of comparison rules is matched when executing an alert rule
- Actions to take when the condition block is matched. There are 3 separate controls available.
- Whether to generate or notification for this case
- Update notification channels and recipients
- Add, remove, or modify contents in the notification
Evaluation conditions are like a set of rules that the system checks one by one. It starts at the top and goes through each rule. When it finds a rule that matches the current situation, it stops checking further rules and takes the actions specified in that rule.
In other words, the first matching rule in the list is the one that counts, and the system won’t bother with the rest once it finds a match.
Common Use Cases: These options give you a lot of flexibility in how you set up your alerts. We’ll explore these features in more detail here.
Programmable Alert Creation
Include the previous steps from Simple Alert Creation and Compound Alert Creation, that is, Basic Information, Data Models, and Logic Conditions, and continue configuring the Evaluation Script and Alert Controls as explained further.
Step 4. Evaluation Script (optional)
vuSmartMaps lets you use Python scripts to create programmable alerts. Using an evaluation script, you can generate alerts for breaching any business logic. Below is a typical alert engine execution workflow and where the evaluation script is used.
The evolution script runs after metrics are checked and thresholds are applied, allowing you to customize alert behavior. Apart from implementing business logic to generate the alert, you can also tweak alert notification content and channel settings like who gets notified.
In simple terms, the Python script lets you create detailed and specific alert conditions that fit your needs. You can write this script in the “Evaluation Script” section.
In the evaluation script, you can do the following:
- Set Custom Conditions: You can implement complex conditions using programming logic to determine if the alert should be generated. For instance, you can have different thresholds for “Development” systems or dynamically adjust the threshold based on server type, location, and deviation.
- Control Notifications: Decide which notification channels to use and who should receive notifications. For example, you can send an email to an escalation team if the alarm condition persists for more than 4 hours.
- Customize Notification Content: Modify notification content and add extra information. You can include dynamic action recommendations based on metrics and their values.
Example: Adding New Fields using Evaluation ScriptYou can add new fields to the notifications generated by the system using the evaluation script. For instance, if you need to include a new field or category with values based on the transaction success rate metric, you can achieve this with the following script snippet.
success_rate = get_vumetric_value(D, 1, ‘Success Rate’) if success_rate and success_rate > 90: DYNAMIC_FIELDS[‘category’] = ‘Normal’ else: DYNAMIC_FIELDS[‘category’] = ‘Need Investigation’ RESULT = True
As can be seen, any field to be added to the notification generated can be specified in the DYNAMIC_FIELDS dictionary with the corresponding key and value.
Common Use Cases: These options give you a lot of flexibility in how you set up your alerts. We’ll explore these features in more detail here.
The programming interface is supported exclusively using Python Language.
Step 5. Alert Controls
In this step, you can set up how alert notifications work for this rule. You can configure notification channels, and recipients, enable or disable alarm mode, and control the intervals for active alert rule notifications.
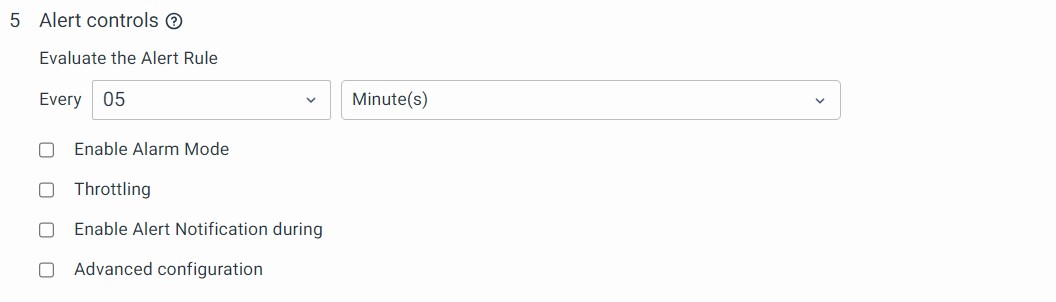
- Evaluate the Alert Rule: These settings allow you to tell the system how frequently this alert rule should be executed. If this alert is critical and you want to generate this faster, you can reduce this to a minimum of 1 minute.
- Enable Alarm Mode:
- When enabled, the system tracks the state of an alarm. Notifications are generated when the alert condition turns active or when the condition gets cleared. In the intermediate period, when the condition continues to be active, no further notifications are generated. Enable mode is the default state.
- When disabled, notifications are generated at regular intervals as decided in the ‘Evaluate the Alert Rule’. In this case, the system does not track the state of the alert and no clear notifications will be generated.
- Throttling: The throttling is applicable only when alarm mode is disabled.
- When throttling is enabled, the system stops sending notifications for a particular condition for the configured interval.
- For example, for a CPU utilization alert, if the throttling interval is configured as 2 hours, a CPU usage high alert for a particular server will be notified a second time only after 2 hours from the first notification.
- This configuration would be useful to avoid repeated notifications when alarm mode is disabled.
- Enable Alerts Notification during: This configuration is handy for avoiding notifications during periods of lower activity, such as weekends or non-business hours, ensuring that you only receive notifications when it’s most relevant.
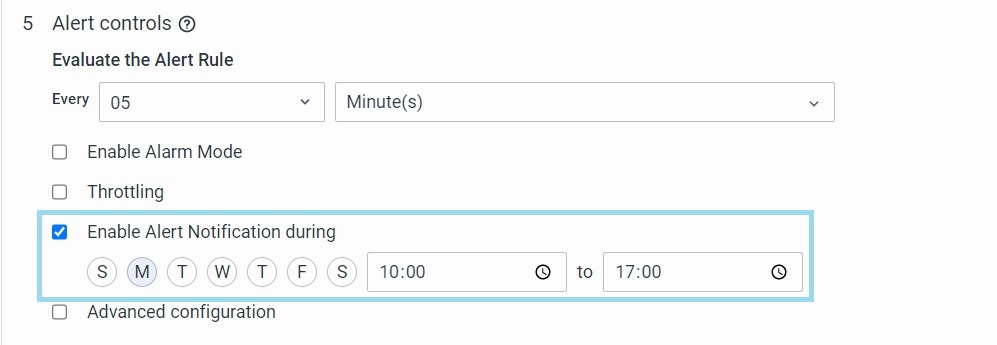
You can specify an alert's active period to prevent it from triggering alerts during planned maintenance activities. During this period, the rule won't generate alert notifications, but you can still access them in the Events section for reference.
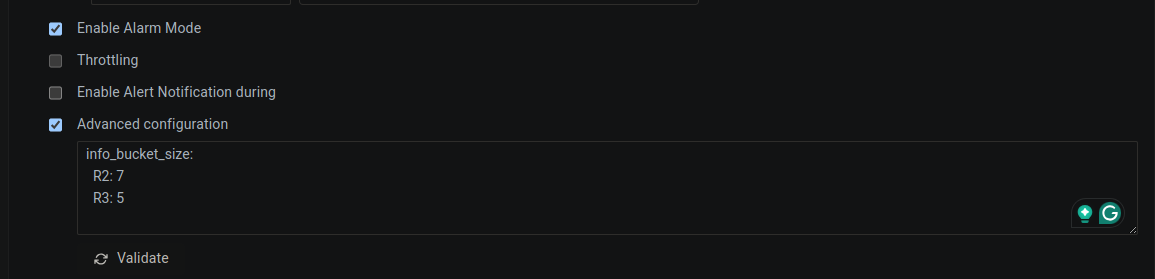
- Advanced Configuration: Experts configure the more advanced settings. This is sometimes also used by the Software development team to extend Alert functionality without changing the User Interface.
- You can use the Advanced Configuration for adding new functionalities to alert rules through a YAML interface.
- It's a way to configure features that may not be available through the regular menu options.
- For instance, you can configure the alert notification level using this interface by specifying it in the advanced configuration text area.
notification_level: 0
- Activate Notification Management Routing: You can configure and activate the Notification Management routing alerts by specifying them in the Advanced Configuration. Please note that all other Notification Channels configurations will be invalid once this is activated. And, notifications will happen based on the configuration in the Notification Management.
- Advanced Configuration for Max Bucket Size: Recognizing the need for flexibility, we've introduced an advanced configuration option. This feature empowers users to override the max bucket size for any information rule within an alert. With customization at the forefront, this update allows for individualized settings across all information rules while maintaining a default value of 5. This enhancement is a step forward in offering our users the control they require to tailor the system to their specific needs.
-
Related Dashboards: -
-
To configure Related dashboards of an alert, use the YAML configuration as shown below. “Device Availability Overview” is the name of the dashboard which is preconfigured and called here.
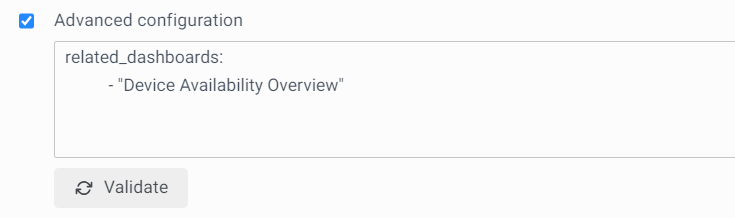
- The output of this configuration is seen in the ‘detailed view’ of the Alerts on the Alert Console.
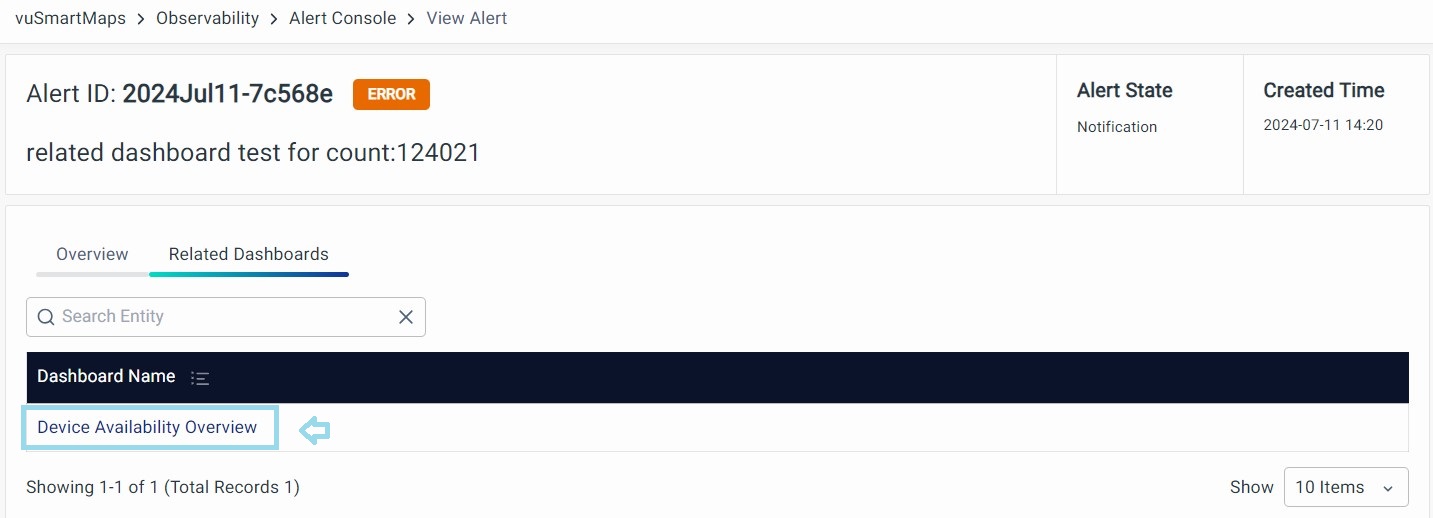
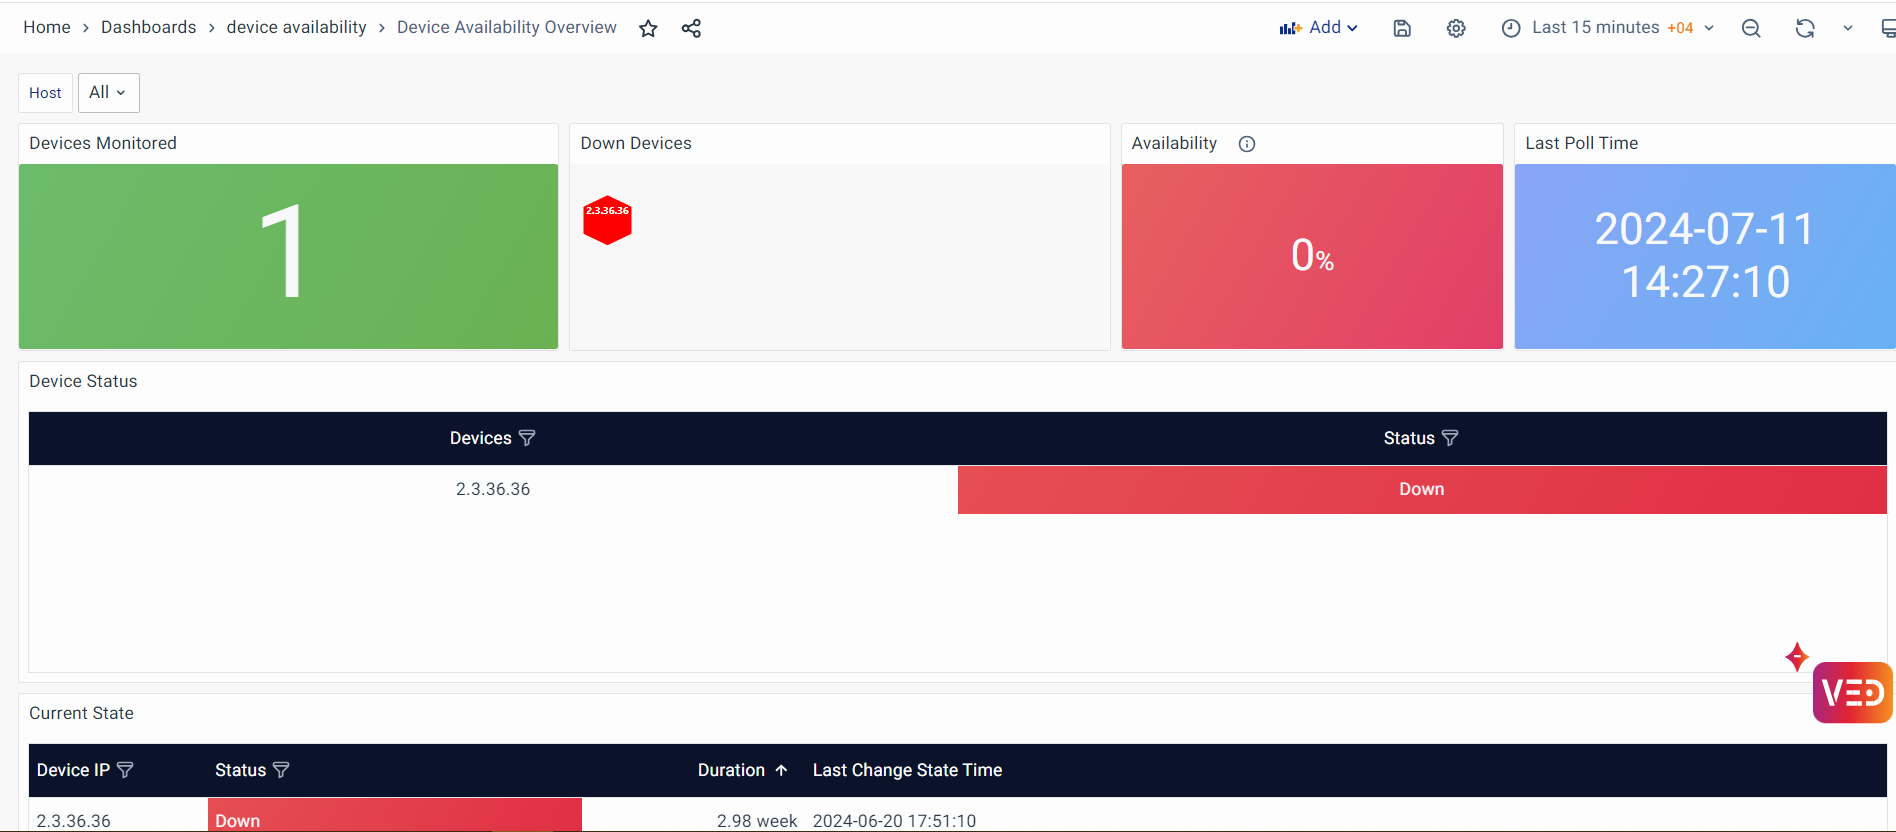
- Click on the name of the dashboard highlighted and the respective dashboard will be displayed.
- Tags: - To add tags during Alert configuration, enable the Advanced Configuration section and use a YAML script like the one shown in the attached snapshot below.

Common Configuration for all types of Alerts
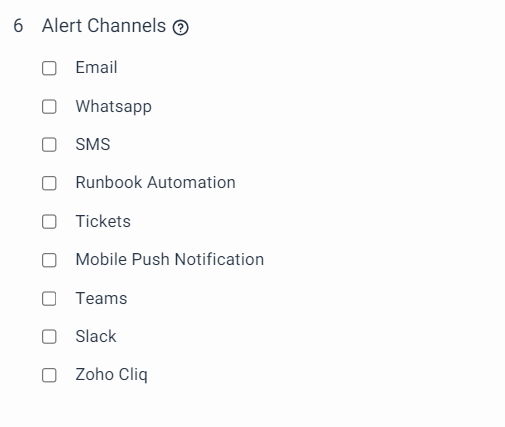
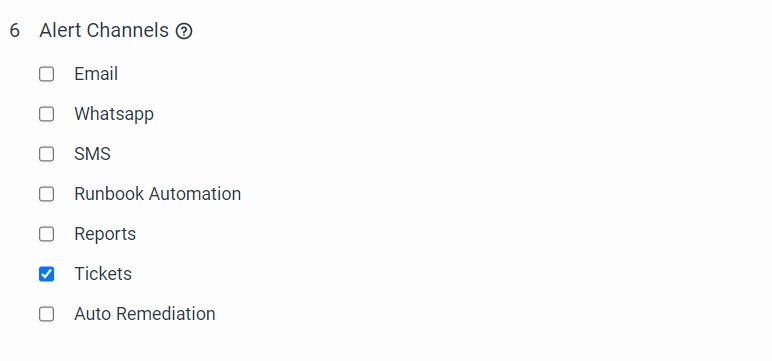
Step 6. Alert Channels
Use this section to control the alert notification channels.
Email
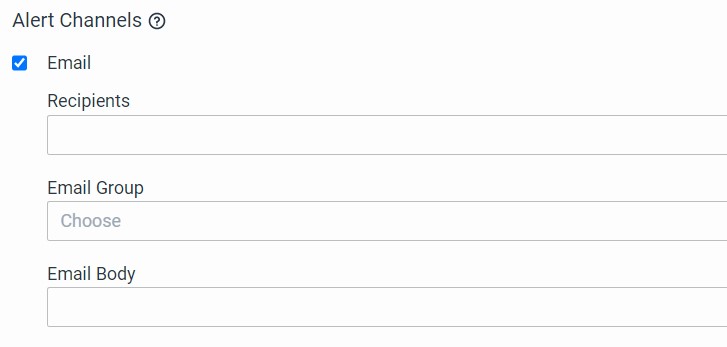
The system notifies users through email. A list of email identifiers of recipients or an email group corresponding to the recipients is to be configured here.
Email identifiers and email group names are specified as a comma-separated list. Please refer to the email groups sections to understand how to conFig email groups.
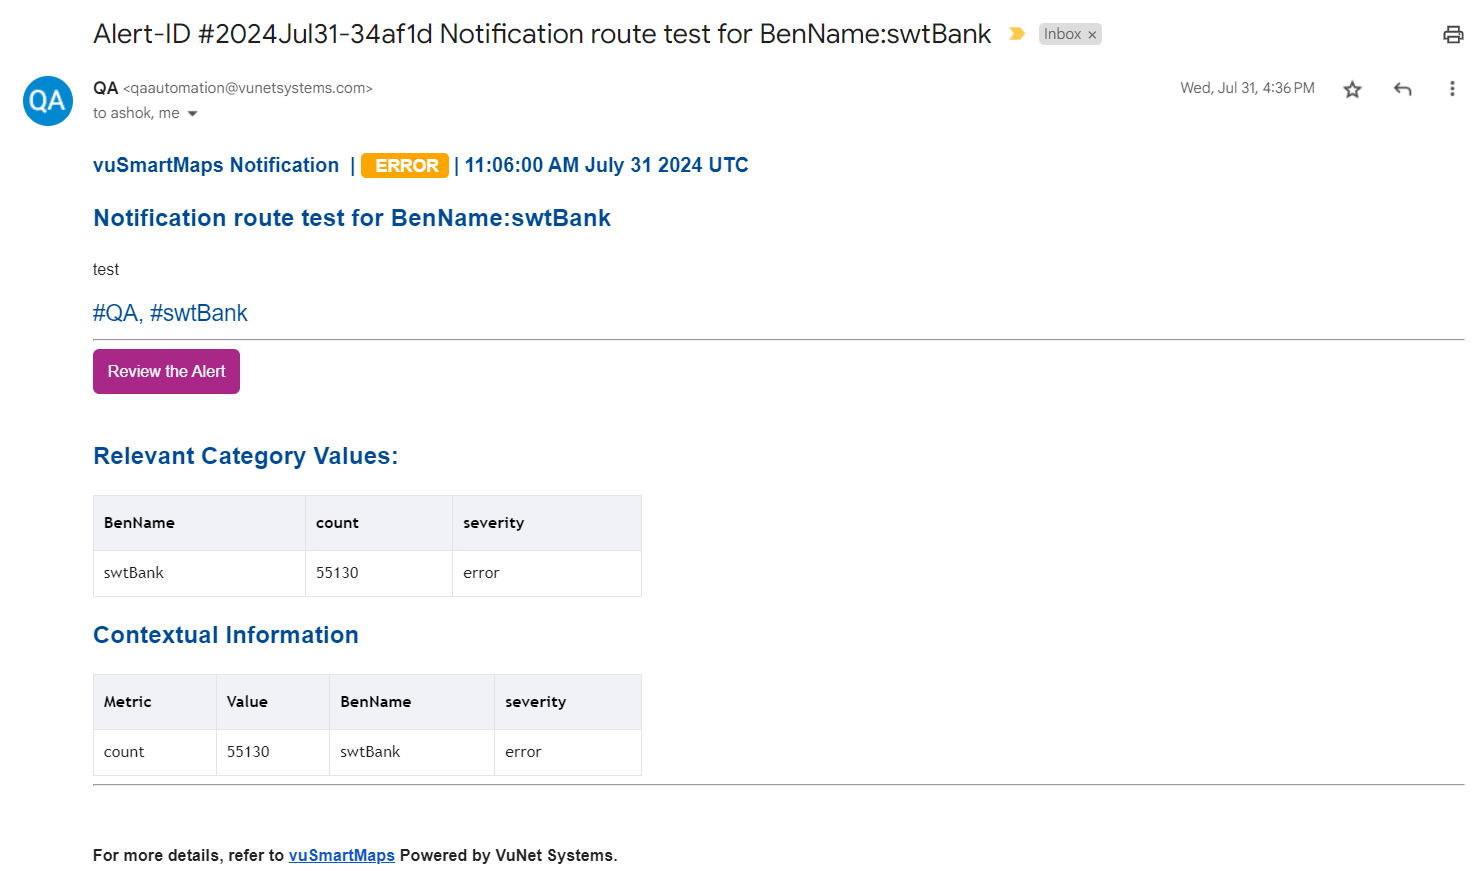
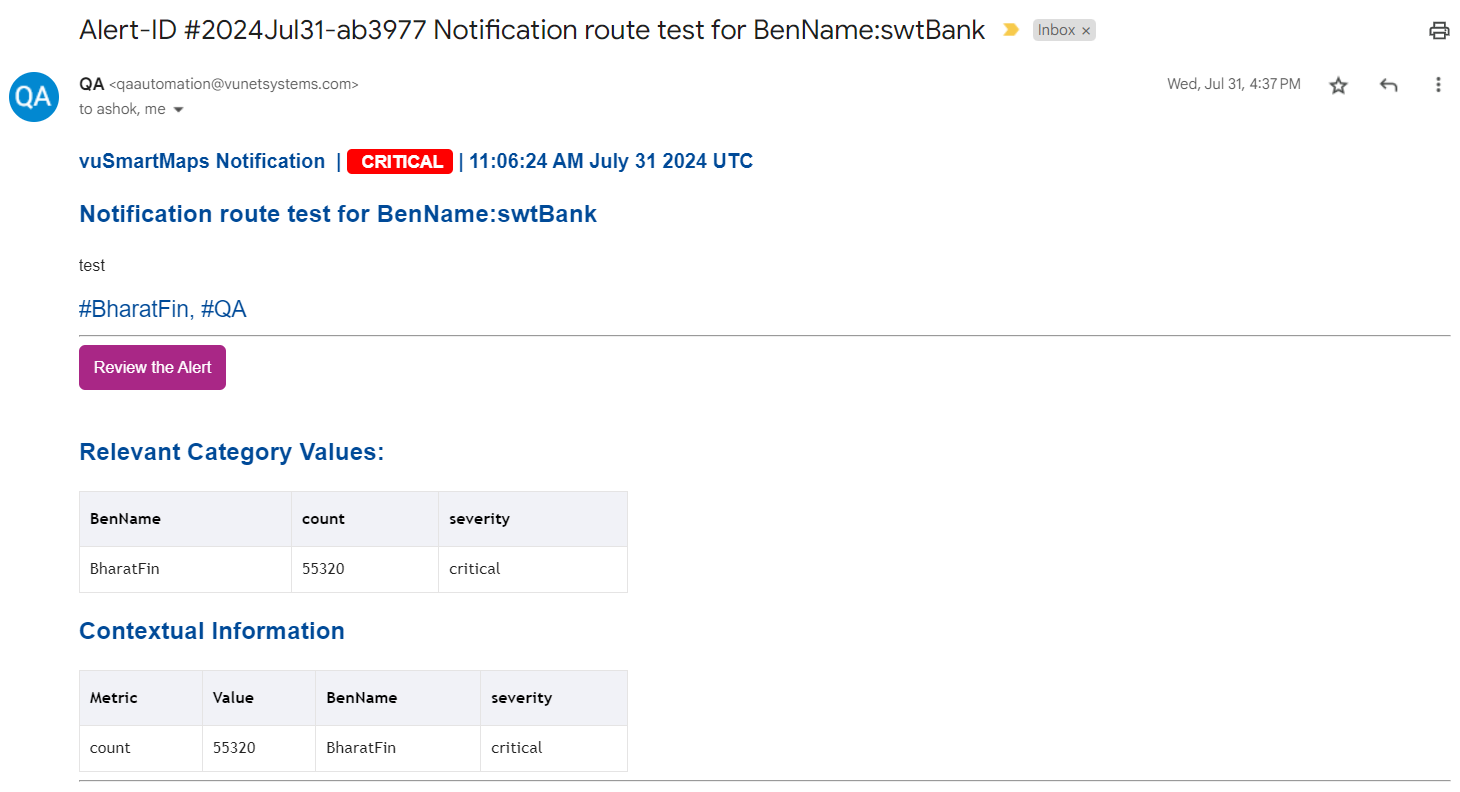
The system uses a predefined email format for notifications. A sample email notification is shown below.
Error Notification
Critical Notification
The default notification email format used by the system can be replaced with a user-configured static text.
WhatsApp
vuSmartMaps platform can notify users through WhatsApp. Recipient Mobile numbers are to be configured here.
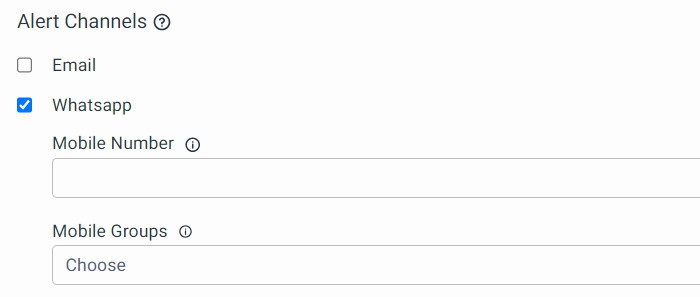
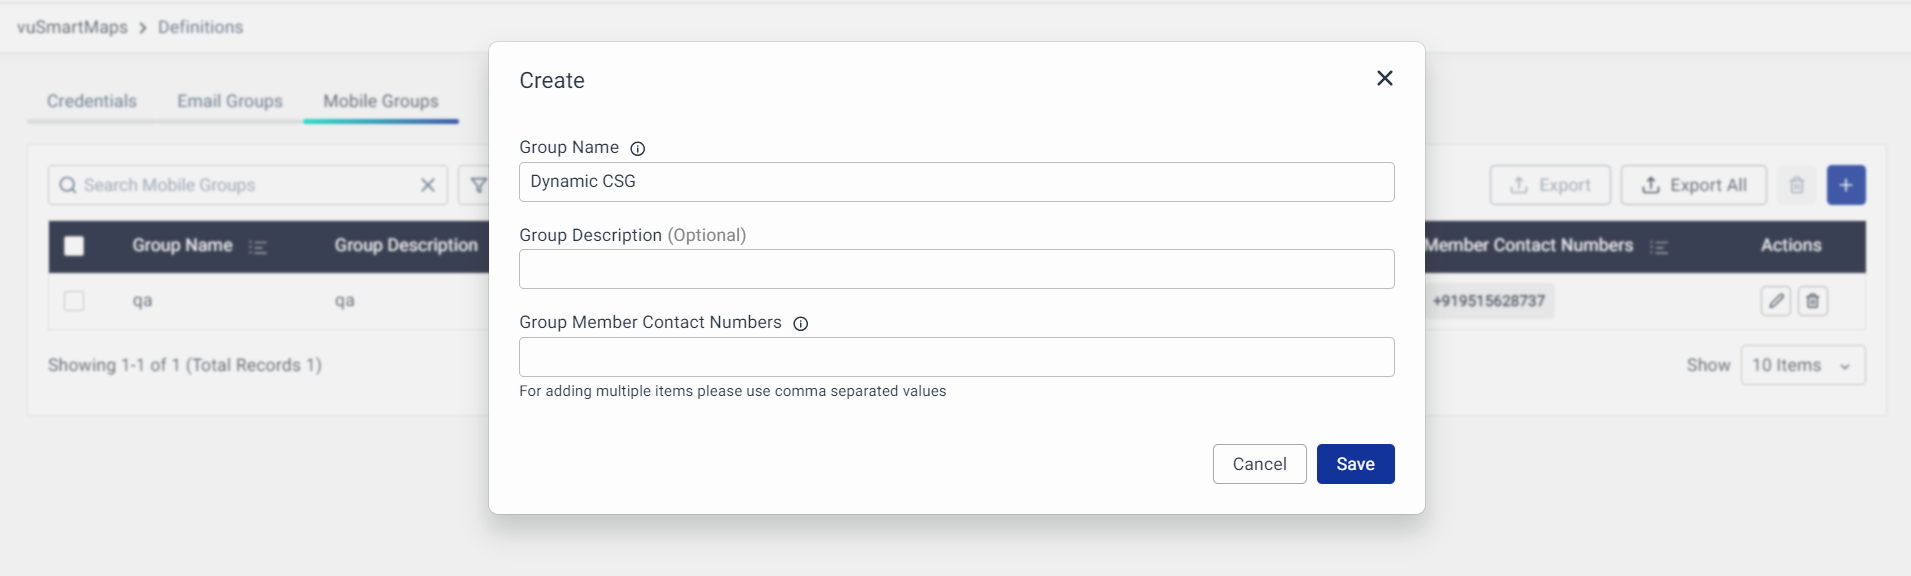
To configure Mobile Groups,
- Go to Definitions under Platform settings from the Side Navigation Bar.
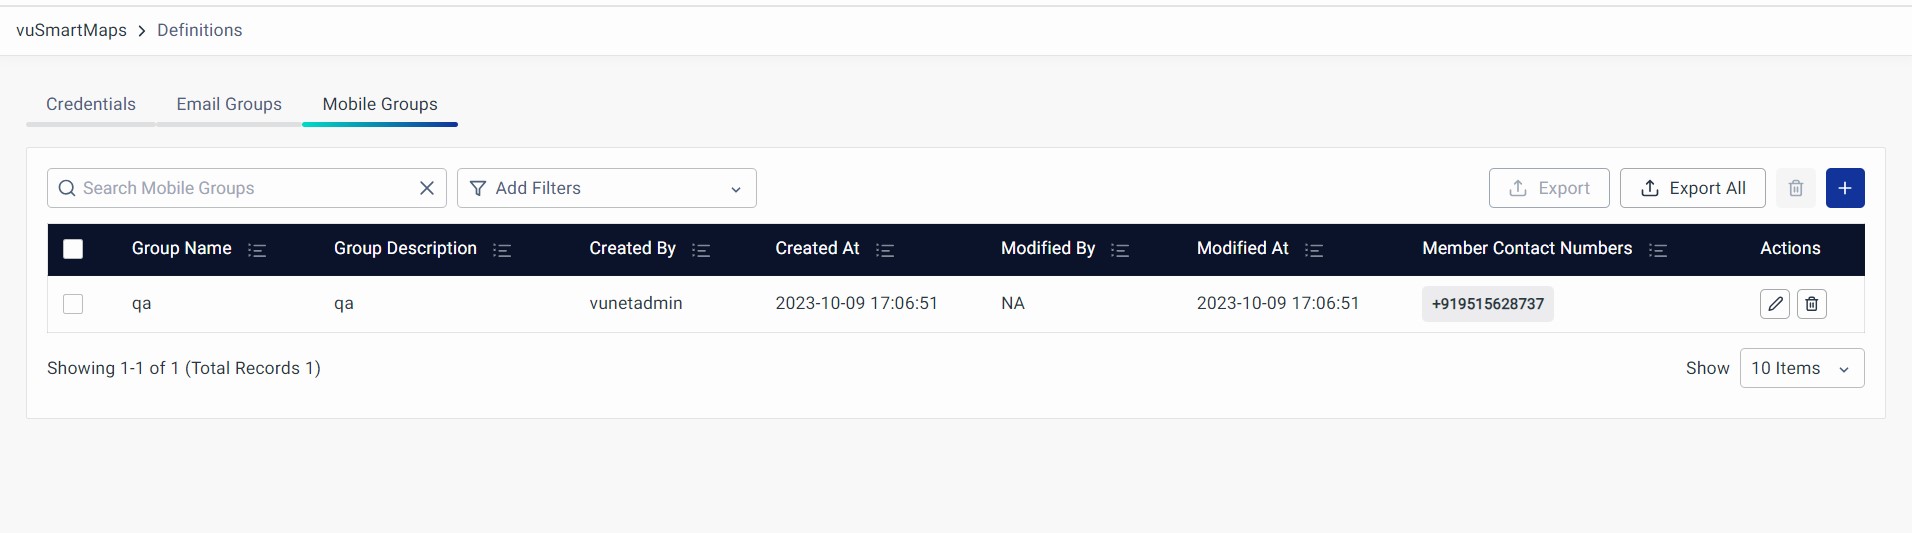
- Click on the + button and enter the group name, optional description and list of mobile numbers.
The use of WhatsApp as an alert notification requires a special activation in the vuSmartMaps installation to enable Business APIs for WhatsApp. Please contact the support team for more details on this.
SMS
SMS can be configured in its alert channel. The SMS text will appear in the SMS body. SMS groups can be configured similar to Mobile groups of Whatsapp.
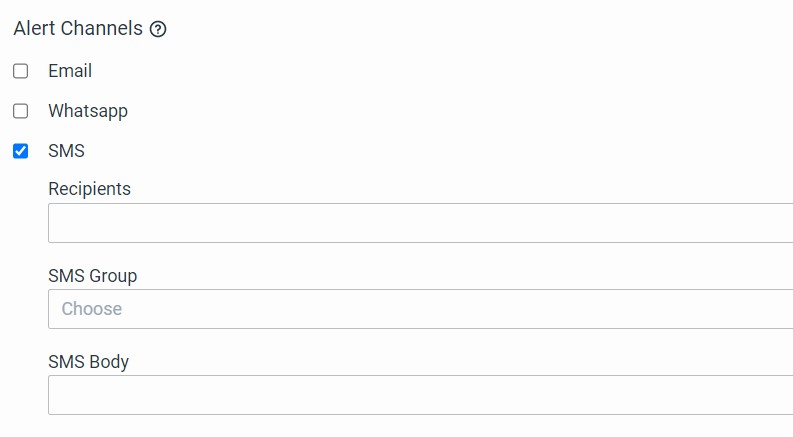
The above configuration is required to use the SMS Channel. This will send a default Alert via SMS which will contain the following details.
- Summary of the alert
- Tags related to the alert
- The severity of the alert
Sample SMS - CPU Utilization for Host_Name:IHYDIBMPF-C1B5-CL6, Touch_Point: xMobile #DAQ #Server Health. The severity of Alert - Warning
In case a custom alert message is required, it can be configured using the alert format string as shown below.
Sample SMS - vuSmartMaps Alert APP - UPI KPI-Technical Decline TH:0.5% ACT - 0.52 % Details - FailedAt: XYZ RespCode: U48 AlertTime: 22.06.2020 08:35:33 IST ActiveSince: 12 Hour(s) and 30 min(s) Past Incidents Today - 7 incident(s) spanning 45 Min(s)
The alert document contents can be seen on the search page by selecting the notification index. The alert document lists the full set of fields that can be included in the SMS message using the placeholder string format defined above.
Some examples of the fields that users can use in alert messages are -
-
Header Section
{{header>Alert-Rule-Name}}- Name of the alert{{header>severity}}- Severity of the Alert{{header>summary}}- Summary of the alert{{header>type}}- Alert Type{{header>description}}- Alert description{{header>duration}}- Duration of the alert alarm{{header>start_time}}- Time at which the alert started{{header>@timestamp}}- Time at which the current alert got triggered{{header>tags}}- Tags attached to the alert
-
History Section
{{History>Today}}- Information about past incidents today{{History>Last 7 Days}}- Information about past incidents in last 7 days{{History>Last 1 Month}}- Information about past incidents in the last month
-
Rule Metrics
{{R1>M1}}- A formatted value of the first metric of the first rule{{R1>M1>average_rtt}}- If there are any additional fields in any metric, they can be accessed this way.{{R2>Information[1]>M1}}- If the rule is an Information rule, users can access metric data in such a way. In this example, the user is accessing the Top value of the first metric from the second rule which is an information rule behind the scenes of SMS Alert Channel.
To use SMS as an alert notification channel, you need to activate SMS APIs and SMS Gateways in your vuSmartMaps installation. Please reach out to our support team for detailed information on this process.
Runbook Automation
You can set up alert rules to trigger predefined scripts. These scripts can automate actions like remediation and data collection.
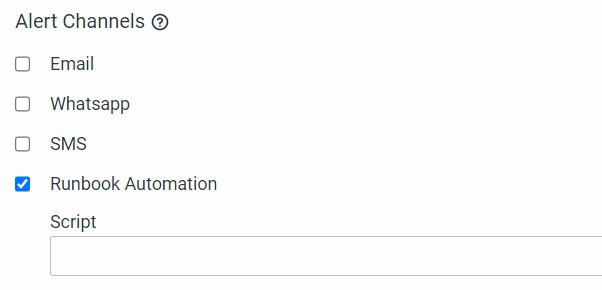
For instance, in a rule monitoring router interfaces, you can configure a script to bounce (restart) an interface when it goes Down.
The script can use information from the alert notification and configuration to make decisions. Below is a sample script template.
if __name__ == "__main__":
    try:
        opts, args = getopt.getopt(sys.argv[1:], "", [])
    except getopt.GetoptError:
        sys.exit(1)

    # Collecting arguments
    alert_document = json.loads(args[0])
    alert_configuration = json.loads(args[1])
    mobile_number = alert_configuration.get('mobile_sms', None)
    sms_content = alert_configuration.get('sms_content', None)

    print(mobile_number)

    sms_list = _prepare_sms_body(
        alert_document, alert_configuration, mobile_number, sms_content)
A typical alert document passed to the script is shown below:
{
  "History": {
    "Today": {
      "Event Count": 19,
      "Active For": 26745.087917
    },
    "Last 7 Days": {
      "Event Count": 78,
      "Active For": 211002.844929
    },
    "Last 1 Month": {
      "Event Count": 238,
      "Active For": 1702128.547532
    }
  },
  "Alert-Rule-Evalution-Duration": "12 Minutes",
  "duration": 300,
  "alert_id": "3275183",
  "timestamp": "2020-06-14 06:21:51",
  "R1": {
    "name": "BMV For Server CPU Utilization R1",
    "M1": {
      "value_for_eval_duration": "0.8537999987602234",
      "matched_threshold": "> 0.01",
      "field": "system.cpu.total.norm.pct",
      "color": "#05a608",
      "insights": "Looks all fine",
      "label": "SYSTEM.CPU.TOTAL.NORM.PCT",
      "formatted_value_for_eval_duration": "85.38%",
      "type": "number"
    },
    "status": "Available"
  },
  "severity": "warning",
  "summary": "CPU Utilization for target:10.121.9.56",
  "alarm_state": "Alarm New",
  "Alert-Rule-Name": "Server CPU Utilization",
  "group_values": "10.121.9.56",
  "target": "10.121.9.56",
  "tags": ["Server Health", "10.121.9.56", "DAQ"],
  "start_time": "2020-06-14T06:16:51.000Z",
  "Type": "CPU Utilization",
  "@timestamp": "2020-06-14T06:21:51.000Z",
  "group_label": "Server CPU Utilization 10.121.9.56"
}
A typical alert configuration is passed to the script is shown below:
{
  "enableAlert": true,
  "enableThrottle": true,
  "alertByReport": false,
  "activeStartTime": "00:00:00",
  "alertEmailBody": "",
  "alertByTicket": false,
  "severity": "warning",
  "advancedConfiguration": "\"tags\":\n  	- \"Server Health\"",
  "throttleDuration": 2,
  "description": "Process Memory Utilization for %g is %m",
  "alertReportList": "[]",
  "enable_ansible_playbook": false,
  "ansible_playbook_name": "",
  "summary": "Process Memory Utilization",
  "throttleDurationType": "hour",
  "alertEmailId": "",
  "enable_runbook_automation": false,
  "activeAlertCheck": "",
  "alertEmailGroup": "",
  "runbook_script": "",
  "alertByEmail": false,
  "ansible_playbook_options": "",
  "ruleLevelThreshold": "",
  "title": "Server Process Memory Utilization"
}
Script Placement
Once you've written your runbook script, place it in the specified location on the shipper, and then restart the alert container.
/data/configs/vunet-scripts
Example 2:
import smtplib
import getopt
import sys
import json


if __name__ == "__main__":
   try:
       opts, args = getopt.getopt(sys.argv[1:], "", [])
   except getopt.GetoptError:
       sys.exit(1)


   # Collecting arguments
   alert_document = json.loads(args[0])
   alert_configuration = json.loads(args[1])


   alarm_state = alert_document.get("alarm_state")
   alert_id = alert_document.get("alert_id")
   alert_name = alert_document.get("Alert-Rule-Name")


   if alarm_state != "Alarm New":
       sys.exit(1)


   # create a server instance
   server = smtplib.SMTP("smtp.example.com", 587)


   # start server connection
   server.starttls()


   # login using username and password
   server.login("username@example.com", "password")


   # create message
   msg = (
       "Hello, this is a test email for an alarm new "
       + f"notification for alert {alert_name} with alert id {alert_id}"
   )


   # send message
   server.sendmail("sender@example.com", "recipient@example.com", msg)


   # end server connection
   server.quit()


   sys.exit(1)
Tickets
The system connects to the configured ITSM system and updates a ticket when alert conditions turn active.
Configure the ITSM system and its access details in the ITSM preferences located in the Preferences tab of vuSmartMaps.
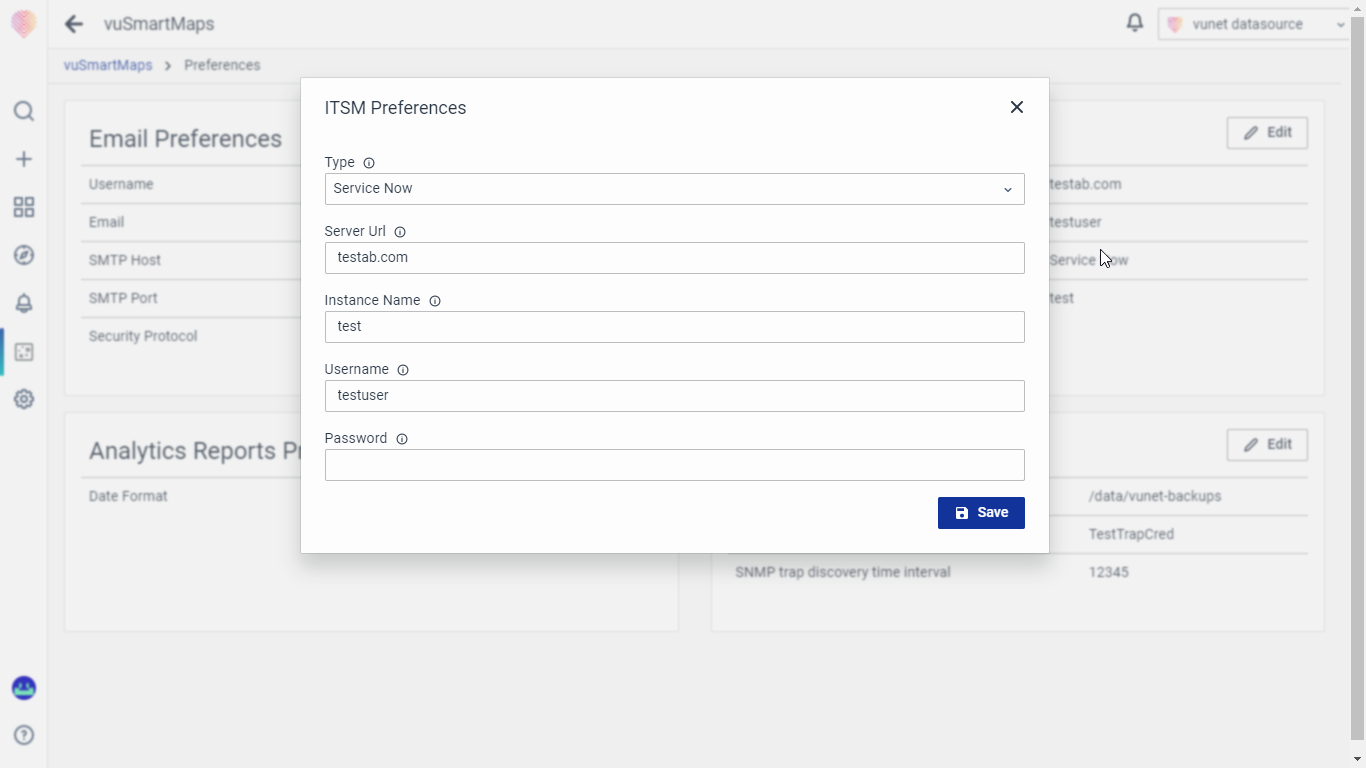
Usually, when an alarm condition becomes active, vuSmartMaps automatically creates a new ticket in the ITSM system. If the same condition repeats quickly, vuSmartMaps may update the existing ticket with more information.
Mobile Push Notifications
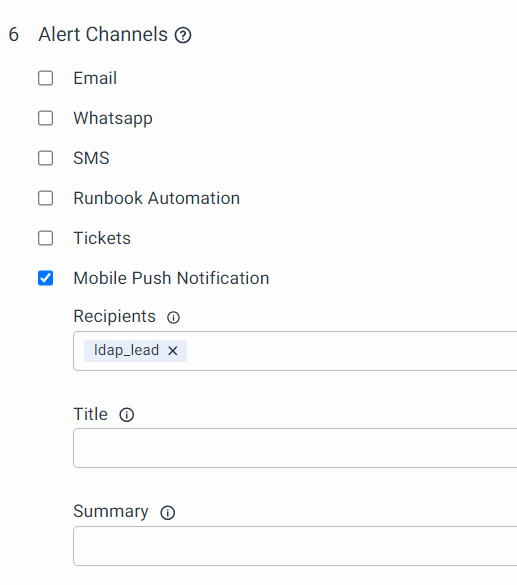
To configure Mobile Push Notification,
- Select the 'Mobile Push Notification' option.
- Recipients: Select Recipients from the list. Use the dropdown to select target users for the push notifications; notifications will be sent to all users if no users are selected.
- Title and Summary: This needs to be short under 40 characters. You can optionally enter a Notification Title and Body; if left blank, the alert rule's title and summary will be used.
- Notifications will be received in three app states: when the app is closed, in the background, or the foreground.
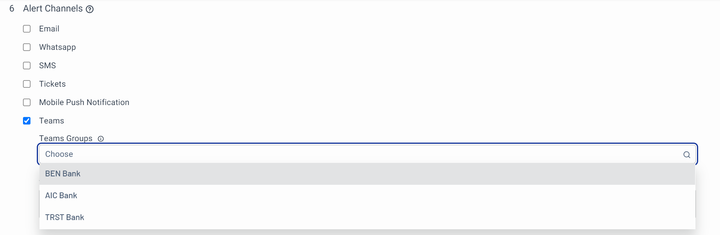
Microsoft Teams
vuSmartMaps platform can notify users through Teams Channels. Recipient phone numbers are to be configured here.
-
Team Groups: Select Microsoft Teams channels from the dropdown list. The list includes channels added in the Preference Section.
-
Team Message Body: Add content that needs to be sent as a message. Eg:
Alert_Name: {{Alert-Rule-Name}}andSeverity: {{severity}}. The variable inside the brackets will be substituted with values in real time.
Example Fields for Alert Messages
-
Header Section
{{header>Alert-Rule-Name}}- Name of the alert{{header>severity}}- Severity of the Alert{{header>summary}}- Summary of the alert{{header>type}}- Alert Type{{header>description}}- Alert description{{header>duration}}- Duration of the alert alarm{{header>start_time}}- Time at which the alert started{{header>@timestamp}}- Time at which the current alert got triggered{{header>tags}}- Tags attached to the alert
-
History Section
{{History>Today}}- Information about past incidents today{{History>Last 7 Days}}- Information about past incidents in last 7 days{{History>Last 1 Month}}- Information about past incidents in the last month
-
Rule Metrics
{{R1>M1}}- A formatted value of the first metric of the first rule{{R1>M1>average_rtt}}- If there are any additional fields in any metric, they can be accessed this way.{{R2>Information[1]>M1}}- If the rule is an Information rule, users can access metric data in such a way. In this example, the user is accessing the Top value of the first metric from the second rule which is an information rule behind the scenes of SMS Alert Channel.
The use of Microsoft Teams as an alert notification requires a special activation in the vuSmartMaps installation to enable Business APIs for Microsoft Teams. Please contact the support team for more details on this.
Slack
vuSmartMaps platform can notify users through Recipient Slack Channels.
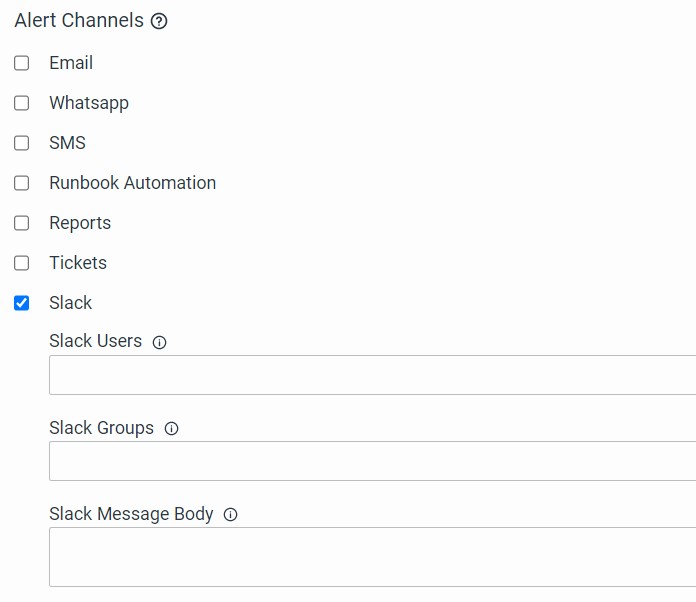
- Slack Users: Enter Slack User IDs by separating them with commas.
- Slack Groups: Enter Slack Channel IDs or names by separating them with commas. The channels that are configured in the Preference Section must be entered here.
- Slack Message Body: Add content that needs to be sent as a message. Eg:
Alert_Name: {{Alert-Rule-Name}}andSeverity: {{severity}}. The variable inside the brackets will be substituted with values in real-time. - For the list of fields used in alert messages, please refer to the "Example Fields for Alert Messages" section.
The use of Slack as an alert notification requires a special activation in the vuSmartMaps installation to enable Business APIs for Slack. Please contact the support team for more details on this.
Zoho Cliq
vuSmartMaps platform can notify users through Zoho Cliq Channels.
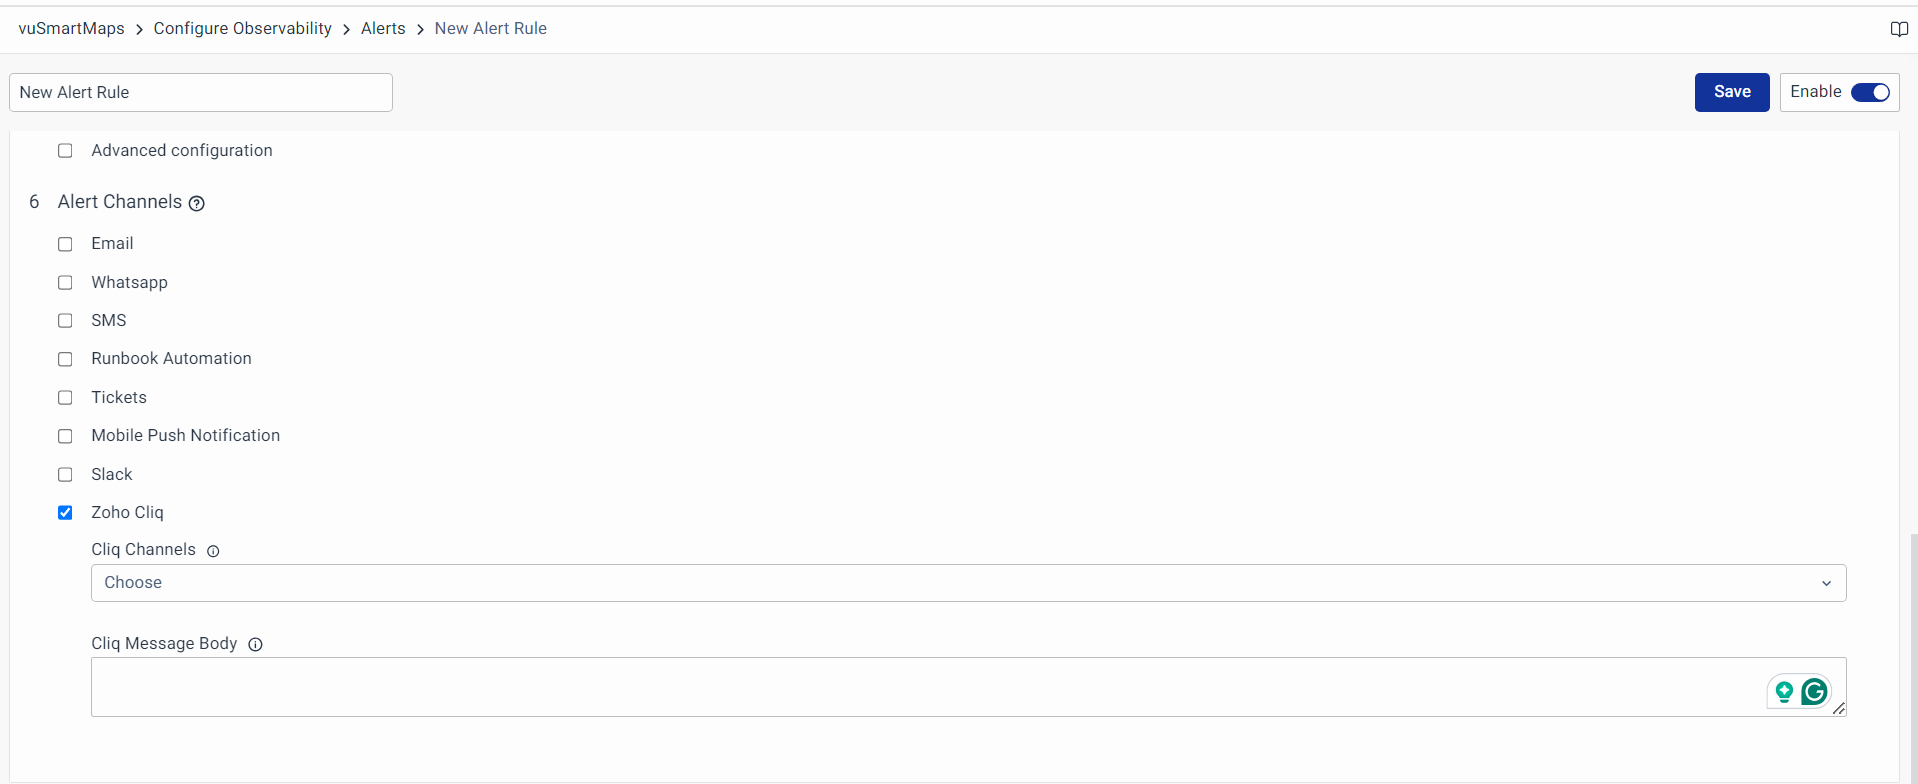
- Cliq Channels: Select the channel name from the dropdown, and the corresponding URL for the channel will be configured in the Preferences section.
- Cliq Message Body: Add content that needs to be sent as a message. Eg:
Alert_Name: {{Alert-Rule-Name}}andSeverity: {{severity}}. The variable inside the brackets will be substituted with values in real time. - For the list of fields used in alert messages, please refer to the "Example Fields for Alert Messages" section.
View Generated Alerts
To locate the View Generated Alerts guide and learn where to find notifications, head to the Notification Center.
