Installation Guide
Introduction
vuLauncher is a standalone application designed to facilitate the deployment of vuSmartMaps™. The application operates via a command-line interface (CLI) and supports installation in two distinct environments:
- Virtual Machines: vuSmartMaps can be installed on virtual machines running any of the supported operating systems. The vuLauncher installs the base Kubernetes platform using the kubeadm provider, followed by the deployment of the vuSmartMaps application.
- Managed Kubernetes: vuSmartMaps can also be deployed on managed Kubernetes infrastructures, such as Amazon EKS, Azure AKS, Google GKE, OpenShift, and more.
Deployment Prerequisites
Managed Kubernetes Cluster
vuSmartMaps requires a managed Kubernetes cluster to setup the platform. Supported Kubernetes clusters include:
- Managed on-premise clusters like Openshift or Rancher.
- Amazon Elastic Kubernetes Service
- Azure Kubernetes Service
- Google Kubernetes Engine
Prerequisites for Managed Kubernetes Cluster
- Dedicated VM:
- A jump box VM is required to access the Kubernetes cluster with appropriate credentials.
- Supported Kubernetes Version:
- The Kubernetes version must be 1.29 or higher.
- Launcher Configuration:
- vuLauncher utilizes a set of YAML configuration files that define the installation environment and resource limits for application services. These configuration files are typically created before deployment and are specific to each installation.
- Loadbalancer Address
- vuSmartMaps has a few external-facing services for UI access, brokers, and trace collectors. On managed cloud Kubernetes platforms, these services must be exposed via load balancer addresses, which need to be configured and available prior to installation.
Virtual Machine Deployment
vuSmartMaps can be installed on virtual machines with supported OS. However, this requires additional effort to set up a native Kubernetes cluster on the VMs before installing the vuSmartMaps platform.
vuLauncer shall be run from one of the VMs provided for installation. In general, one VM is designated for vuLauncher which will facilitate the installation process and is subsequently used for internal platform monitoring.
- Supported Operating Systems for VMs:
- Ubuntu: 20.04, 22.04
- RHEL: 7.x, 8.x, 9.x
- Oracle Linux: 7.x, 8.x
- Security Considerations:
- If the VMs have undergone security hardening, Kubernetes dependencies must be allowed or exempted. For example, kernel modules required for Kubernetes networking, such as br_netfilter, ip_tables, overlay, nf_nat, etc., should be permitted.
General Network and Node/VM Permissions
- Network Access:
- A list of ports that need to be opened on the firewall is detailed in later sections of this documentation.
- Sudo user privileges are required for vuLauncher VM and all Kubernetes nodes/VMs until installation is complete.
- In case of restricted internet access, technical support will be required to install any missing Linux package dependencies.
- Storage and Partitioning:
- The number of VMs and the storage size must align with the platform sizing agreed upon and signed off for the defined monitoring scope.
- The below steps mention creating a group called rvunet and adding vunet user to the group
- Create the group rvunet
- groupadd rvunet
- Add the users to the group
- usermod -aG rvunet vunet
- To change the group ownership of /data, run the following command
- chown -R :rvunet /data
- Set group write permissions accordingly
- chmod -R g+w /data
- Set the setgid bit for the same partition
- chmod g+s /data
- Create the group rvunet
- Additional Permissions:
- SSH access to the VMs part of the cluster from the node running vuLauncher.
- Privilege or technical support to restart nodes as needed
- Fresh VMs are recommended. i.e. The VMs should be clean from any previous Kubernetes or docker installations or any previous versions of vuSmartMaps.
Prerequisites for the VM
The following are specific prerequisites for the VMs used for installation.
- ISCSI initiator utils must be installed and enabled on the VM. This can be installed using standard package managers YUM or APT using package name iscsi-initiator-utils. After installation, the service should be started using “systemctl start iscsid.service”
- SELinux must be disabled
Launcher Prerequisites
Before running vuLauncher, ensure the following prerequisites are met:
- Password-less pubkey based SSH access must be configured for all VMs from the vuLauncher VM.
- VMs with sufficient compute, memory, and storage resources must be provisioned as per the agreed sizing.
- Run the following command to disable swap:
sudo swapoff-a
- Add configuration to detach the mount point automatically in /etc/sysctl.conf
fs.may_detach_mounts=1
Access Requirements
Before proceeding, ensure that the following ports are properly configured on your system.
External Communication
External Access Requirements to download vuSmartMaps binary (for installations and during upgrades).
| SNo. | Source | Destination | Ports | Protocol | Description |
|---|---|---|---|---|---|
| 1 | VM designated to run vuLauncher | download.vunetsystems.com | 443 | TCP | To download the vuSmartMaps installation package. |
| 2 | All VMs | https://ghcr.io/vunetsystems/ | 443 | TCP | VuNet’s GitHub container registry |
| 3 | All VMs | https://pkg-containers.githubusercontent.com | 443 | TCP | VuNet’s GitHub package containers |
Generic External Access Requirements
| SNo. | Source | Destination | Ports | Protocol | Description |
|---|---|---|---|---|---|
| 1 | Users and administrators of vuSmartMaps | vuSmartMaps VMs | 22,443 | TCP | vuSmartMaps Installation, Launch, and configuration |
Data Source specific Access Requirements for telemetry collection
| SNo. | Source | Destination | Ports | Protocol | Description |
|---|---|---|---|---|---|
| 1 | Nodes where vuSmartMaps agents are installed | vuSmartMaps VMs | (SSL)9094, 31094 (NON-SSL) 9092,31092 | TCP | Port of agents to send system and application Logs & infra Metrics to vuSmartMaps. Since Vusmartmaps is set up on the K8S cluster, the listener of the collector service could be running on any of the VMs. Hence the ports should be opened to all the VMs. |
| 2 | Application Servers on which vunet’s APM instrumentation agents are setup | vuSmartMaps VMs | 4317, 4318 | TCP | Data Collection channel for APM traces and logs. Since VuSmartMaps is set up on a K8S cluster, the listener of the collector service could be running on any of the VMs. Hence the ports should be opened to all the VMs. |
| 3 | vuSmartMaps VMs | Network Devices providing SNMP-based access to telemetry | 161 | UDP | Port for SNMP based polling from vuSmartMaps to supported network/security devices |
| 4 | vuSmartMaps VMs | Systems to which vuSmartMaps need to connect over http for telemetry collection | 443 | TCP | Port for http polling, prometheus scraping, etc |
| 5 | vuSmartMaps VMs | Databases to which vuSmartMaps need to connect over JDBC for performance metrics collection | Applicable SQL Database listener ports | TCP | Port for JDBC-based polling to fetch Database health metrics |
| 6 | Network devices sending SNMP traps | vuSmartMaps VMs | 162 | UDP | Port for sending SNMP traps from network devices to vuSmartMaps |
| 7 | Network devices sending syslogs | vuSmartMaps VMs | 514 | UDP | Port for sending syslogs from network devices to vuSmartMaps |
Intra Cluster Communication
Within the vuSmartMaps cluster, various services including the Kubernetes control plane interact across worker nodes. It is preferred that all the VMs are set up within the same VLAN/subnet for unrestricted access. However, if access control policies are enforced, the following communication ports must be opened.
Ports/Communication between vuLauncher VM and vuSmartMaps VMs
| SNo. | Port | Protocol | Description |
|---|---|---|---|
| 1 | 22 | TCP | SSH port. This port should be open for communication from the vuLauncher VM to all vuSmartMaps VMs. |
| 2 | 443 | TCP | Main UI access. Ports should be open between all vuSmartMaps servers and vuLauncher VM. |
Ports/Communication between all vuSmartMaps VMs
| SNo. | Port | Protocol | Description |
|---|---|---|---|
| 1 | 6443 | TCP | Kubernetes Orchestration API port. This port should be open for communication between all vuSmartMaps VMs. |
| 2 | 10250 | TCP | Kubernetes Orchestration service port. This port should be open for communication between all vuSmartMaps VMs. |
| 3 | 10259 | TCP | Kubernetes Orchestration service port. This port should be open for communication between all vuSmartMaps VMs. |
| 4 | 10257 | TCP | Kubernetes Orchestration service port. This port should be open for communication between all vuSmartMaps VMs. |
| 5 | 8472 | UDP | Kubernetes vxLan port. This port should be open for communication between all vuSmartMaps VMs. |
| 6 | 2379 | TCP | Kubernetes Orchestration key-value DB port. This port should be open for communication between all vuSmartMaps VMs. |
| 7 | 2380 | TCP | Kubernetes Orchestration key-value DB port. This port should be open for communication between all vuSmartMaps VMs. |
| 8 | 8000 | TCP | Longhorn data port |
For a single node deployment, ports should be opened internally on the same node.
In the case of multi-node deployment, ports should be opened internally on all the nodes.
Configuration Files
Below is the list of configuration files included in the build. These files are client-specific and may vary for each deployment.
In summary, there are two primary YAML files per client that require thorough verification before initiating the deployment process:
- Environment Configuration File: Contains virtual machine (VM) access credentials and cluster details.
- Sizing File: Specifies the list of VMs, service-to-VM mappings, and their respective resource limits.
Environment Config File
The environment configuration file is located at the relative path:
launcher/static-files/input.yaml
This file includes generic, environment-specific settings such as VM credentials and load balancer IP addresses. For VM credentials, either a password or a private key is required.
# specify if kubernetes cluster is being shared across other user
is_cluster_shared: false

# ssh credentials for all the nodes that are provided in the sizing file.
vm_credentials:
  username: "user"
  password: "password"
  private_key: "path to privatekey" # private key file path

# service name and its loadbalancer
loadbalancer:
  service_name: "loadbalancer address for it"
is_cluster_shared: When deploying vuSmartMaps in an existing Kubernetes cluster that is also utilized by others, this parameter should be set to true.
vm_credentials: Specify the username, password, or private key required to access all nodes in the cluster. The configuration assumes a common set of credentials for accessing all nodes.
loadbalancer: This section will have load balancer addresses for each external facing service of vuSmartMaps. This configuration applies exclusively to managed Kubernetes clusters hosted on cloud platforms.
Sizing File
The sizing file is unique to each environment and client installation. It provides control over resource limits for services, service grouping across nodes, and additional configurations.
It has the following sections:
primary_images section contains the credentials to access the docker images directly from the ghcr. If the client can access ghcr, we will fetch images during runtime. If the VM doesn't have a connection to ghcr, then we will ship the images with the build, if so then one ignores the credentials here. Both the username and password are in encrypted mode.
primary_images:
location:"https://ghcr.io"
username:"*******"
password:"*******"
email:"test@testorg.com"
category section contains a list of tags, which will be used to group the nodes. If the user wants to create a new category its name should be specified here.
 category:
    - "data-store-optimized"
    - "data-hub-optimized"
    - "core-services-optimized"
Env_name parameter specifies the type of environment being used. If we are deploying in VM (without Kubernetes cluster), then the value should be “vm” or else for existing Kubernetes cluster, then the value should be “cloud”
env_name: "vm"
node section is applicable only for the “vm” environment (i.e. when env_name: “vm”). This section contains the details of all nodes necessary for installing the Kubernetes cluster.
- ip_address: Specifies the IP address of the VM node.
- storage: Defines the mount points available on each node. For each data tier, we can provide a list of mount points, that will be considered by longhorn
- vusmart: This data tier doesn’t correspond to any storage class. It will be used for containerd and kubelet. By default, Kubernetes uses a host mount partition to store this information. We will use this data tier to create a soft link to containerd and kubelet
- default: This corresponds to the longhorn-default storage class. For this tier data replica will be 1.
- default-replica: This corresponds to the longhorn-default-replica storage class. For this tier data replica will be 2.
- hot: This corresponds to the longhorn-hot storage class. Here the data replica will be 1. Currently, only clickhouse will this mount point
- warm: This corresponds to the longhorn-warm storage class. Here data replica will be 1. Currently, only clickhouse will use this mount point.
- cold: This corresponds to the longhorn-cold storage class. Here data replica will be 1. Minio object storage service will use this mount point.
- host: This corresponds to the local-storage of the services. Clickhouse-database, keeper and Kafka-broker services has the local storage
- is_master: Set this to true for one of the nodes. This node will be considered to be the Kubernetes master node.
- tags: Here you can specify the name of the group for each node.
node:
    - ip_address: "10.1.1.2"
      is_master: true
      storage:
        default: ["/data1"]
        host: ["/data2", "/data3"]

    - ip_address: "10.1.1.2"
      storage:
        default: ["/data1"]
        vusmart: ["/data2"]
        default-replica: ["/data1"]
        hot: ["/data2"]
        warm: ["/data3"]
        host: ["/data3"]
      tags:
        - "core-services-optimized"
For the “cloud” environment, the following will be the node section.
- node_name: This will be the existing Kubernetes node name. One could get a list of nodes via the command: kubectl get nodes
- tags: This will be the corresponding group name of the nodes.
node:
    - node_name: "node-1"
      tags:
        - "core-services-optimized"

    - node_name: "node-2"
      tags:
        - "core-services-optimized"

    - node_name: "node-3"
      tags:
        - "core-services-optimized"
This section will be available only in a “cloud” type environment. Here, the storage class for each tier must be specified. The default tier is mandatory, while the others are optional.
storage_class:
    default: "storageclass-1"
    hot: "storageclass-2"
    cold: "storageclass-3"
    warm: "storageclass-4"
    default-replica: ""
deployments section relates to the vustream & vublock related components deployed as part of the vuSmartMaps installation.
- name: Name of the service.
- tags: Group categories for node selection. If we specify the category here, we will consider only those nodes with the respective category
- resource_limit: Defines minimum and maximum CPU and memory for the pod
deployments:
	- name: pipeline
  	resource_limit:
    	min:
      	cpu: "0.5"
      	memory: "128Mi"
    	max:
      	cpu: "1"
      	memory: "256Mi"
services section will provide a list of all services to be deployed as part of the vuSmartMaps installation. Each entry will include the following elements:
- name: Name of the service.
- tags: Group categories for node selection. If we specify the category here, we will consider only those nodes with the respective category
- resource_limit: Defines minimum and maximum CPU and memory for the pod
- replica: Number of pods to deploy.
- disk: Specifies required storage for each data tier.
- config_override: if there is any section in values.yaml that the launcher needs to be updated before deployment, then we can provide it here. Here the key will be the yml path till we get it in values.yaml, the value will be the one that gets updated with. If the key doesn’t exist then the launcher will create a new key with a given path.
services:
   - name: "service_name"
     tags:
        - "core-services-optimized"
     resource_limit:
        min:
          cpu: "0.25"
          memory: "500Mi"
        max:
          cpu: "0.4"
          memory: "2Gi"
     replica: 1
     disk:
        default: 2Gi
        default-replica: 2Gi
     config_override:
        defaultSettings.key1: "value1"
        defaultSettings.key2: “value2”
Downloading the binary
- Create a folder in the home directory and download the NG installation binary using the below command
wget https://download.vunetsystems.com/_Downloads_/_vuDocker_/2.14/vuSmartMaps_offline_NG-2.14.tar.gz --user=<username> --password=<password> --no-check-certificate
If you don’t have access to the download server, download the binaries directly from this URL.
- Please check with the Vunet support team to get the credentials for the Download server and the sizing file.
- Sizing file is unique for an environment, update the sizing file details according to the deployment environment.
Refer this link, if we want to download the online binary, in the case of deployments other than VM based ones.
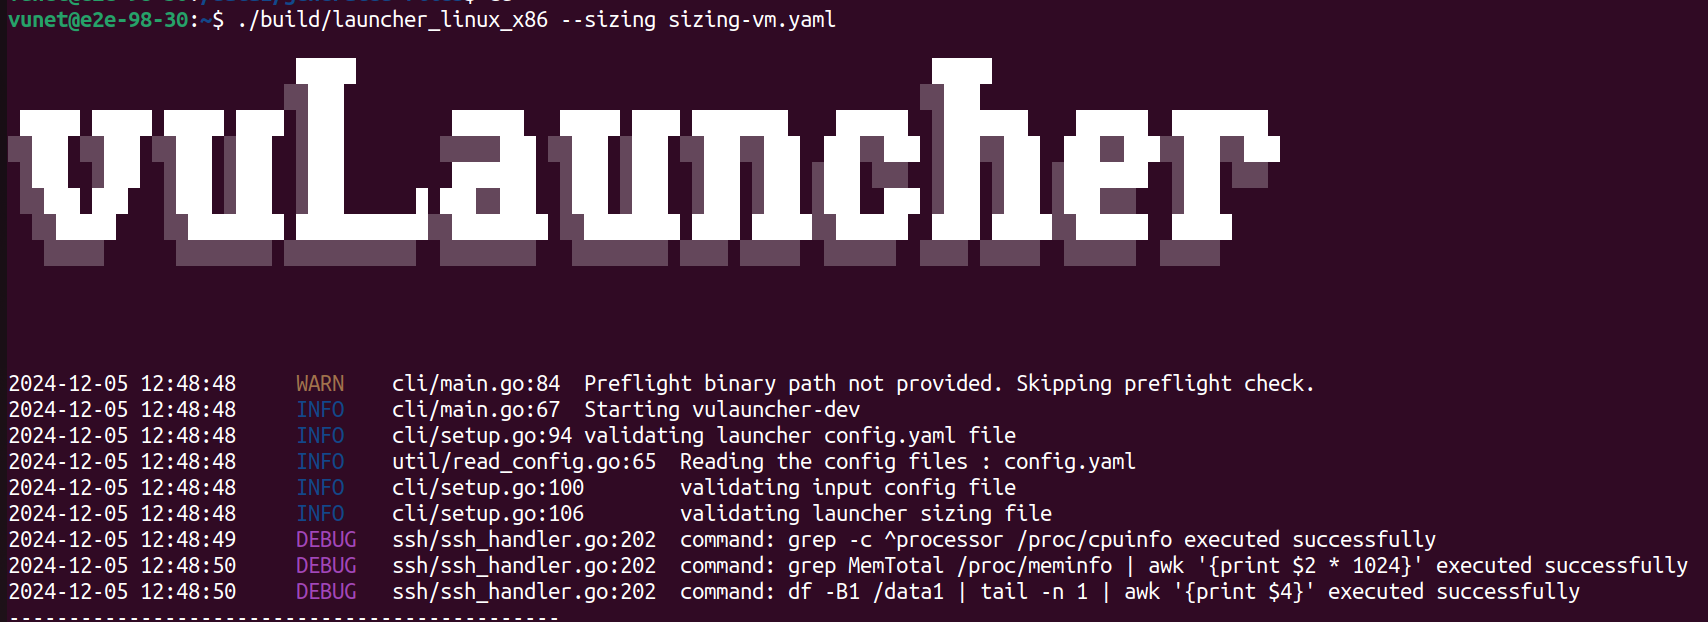
Running Launcher
- Once the build is downloaded, extract the tar file using
- tar -xvzf vuSmartMaps_offline_NG-2.14.tar.gz
- Start the launcher CLI using
./build/launcher_linux_x86 –sizing <path to sizingConfig>
-
Once the launcher is started, it will validate all the configuration files (launcher config, input config, and sizing file). Refer to the image below.
-
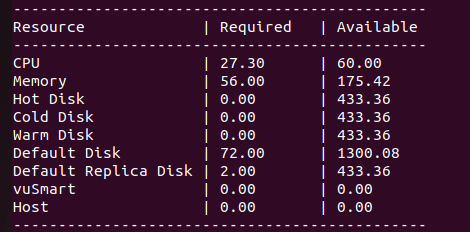
It will show the resource allocation details, update the sizing file, and restart the launcher if any modifications are needed for resource allocation
The entire workflow of the launcher is divided into the following stages :
Copying Kubernetes Package
- This stage copies the kubernetes.tar.gz to all the available nodes in the sizing file.
- This tar file contains all the Kubernetes-related binaries, kubeadm scripts, and docker images.
- This will be copied to the data tier that we specified in the sizing file. Preference of data tier is vusmart > default > hot > warm > cold > default-replica.
Extract Kubernetes Package
- This extracts the kubernetes.tar.gz on all the nodes.
- Here launcher executes the bash command
tar -xzf kubernetes.tar.gzover an ssh connection
Create Soft Link
- This stage creates the soft link for containerd and kubelet.
- The launcher will choose the mount point-based preference: vusmart > default > hot > warm > cold > default-replica.
- Assuming the mount point chosen is /data, then:
- /var/lib/containerd -> /data/vunet/containerd
- /var/lib/kubelet -> /data/vunet/kubelet
noteIf /var/lib/containerd already exists with some data, then this stage will fail. So please ensure that /var/lib/containerd and /var/lib/kubelet are not present.
Master Node Setup
- This stage installs Kubernetes services in the master node. The master node will be identified in the sizing file, marked with
is_master: true.
Worker Node Setup
- This stage will install Kubernetes in all the worker nodes. This installation will happen in parallel.
- If any of the worker nodes fails to get installed then, we will mark this as failure.
Kubernetes Validation
- Once the Kubernetes cluster is successfully installed, we will validate it again to see all the services are running correctly
Kubernetes Pre-Setup
- This stage contains the pre-installation tasks required before installing the actual helm charts. These tasks include:
- Creating node-labels and taints
- Creating a secret to pull docker images
- Executes preK8sManifest
Helm Chart Updates
- This stage will update all the helm-charts with the contents in the sizing file.
Service Installation
- This stage will install all the helm-charts for the services listed in the sizing file.
- Each helm-chart will have its dependent helm-charts specified in the values.yaml file, so the launcher will identify the correct order to install helm-chart.
- If any service helm-chart fails to get installed with an error, then all its parent helm-charts will be skipped.
- There are two cases that we need to be aware of
- If the launcher fails at some services and you want to continue from the failed chart onwards, do not specify the –sizing argument when running the command again. This ensures the existing state is not overwritten and installation will resume from the previous failed helm chart.
- If you want to start services installation from fresh, then one needs to manually remove all the helm-charts and then start the launcher with the sizingconfig argument.
Template Upload
- This stage handles uploading all the agent binaries, vublock, vustream templates, and other static-files to MinIO UI.
- This is the last stage of the installation.

Key Points
- If the launcher fails at any step, please check the logs, it should display enough information to debug further, and once the issue is fixed, then you can re-run the command to start again.
- Alternatively, you can run the launcher in debug mode using
./build/launcher_linux_x86 –sizing <path to sizingConfig> --debug - In the service Installation stage,
- If the launcher fails to install some of the services and exits, and you want the launcher to start again from the last failed service, then don’t provide the sizing file argument. ./build/launcher_linux_x86
- If you want to start installing services from the beginning, use the same command with the sizingconfig argument.
- Make sure to remove all the installed helm releases before restarting. Use the following command to remove all helm charts:
helm ls -a --all-namespaces | awk 'NR > 1 { print "-n "$2, $1}' | xargs -L1 helm delete`
Post Deployment steps
Minio-NFS Deployment
-
Follow the below steps to create nfs locally
- sudo apt update
- sudo apt install -y nfs-kernel-server
- sudo mkdir -p /srv/nfs/k8s
- sudo chmod 777 /srv/nfs/k8s
- echo "/srv/nfs/k8s *(rw,sync,no_root_squash,no_subtree_check)" | sudo tee -a /etc/exports
- sudo exportfs -arv
- sudo systemctl restart nfs-kernel-server
-
vi nfs-pv.yaml
apiVersion: v1
kind: PersistentVolume
metadata:
  name: nfs-pv
  labels:
    type: nfs-storage
spec:
  capacity:
    storage: 12Gi     # size of the nfs volume
  accessModes:
    - ReadWriteMany
  persistentVolumeReclaimPolicy: Retain
  nfs:
    path: /srv/nfs/k8s    # path given by client for nfs
    server: 172.16.121.138 # private ip of the server where nfs is there
- kubectl apply -f nfs-pv.yaml -n vsmaps
- vi nfs-pvc.yaml
apiVersion: v1
kind: PersistentVolumeClaim
metadata:
  name: nfs-pvc
spec:
  accessModes:
    - ReadWriteMany
  resources:
    requests:
      storage: 12Gi         # size of the nfs volume
  storageClassName: ""
  selector:
    matchLabels:
      type: nfs-storage
- kubectl apply -f nfs-pvc.yaml -n vsmaps
- Open values.yaml , hard code the pvc name (nfs-pvc) and do helm install
- helm install minio-nfs . -n vsmaps
